目前在vue 2.5.9测试学习
顺便推荐调试工具:vue-devtools,直接去chrome商城安装即可。在引入vue.js时,不能使用min版本不然无法使用。
var vm=new Vue({
     name:'root', //给这里实例化对象取一个名字,组件想知道是哪个实力化对象调用的就使用this.$parent.$options.name
     el:'#app’,   //不能将容器设置在html和body标签上,如果el没声明也可以使用 vm.$mount('#app')来实现
     parent:baba, //该属性一般用在new Vue对象中,
     data:{  //存放数据
         str:'字符串数据',
         arr:[ //json数据
             {name:'名字',age:123},
             {name:'名字',age:123},
         ],
         obj:{age:22,name:'小么'}
     },
     methods:{  //存放事件
        click:function(e){
            console.log(this);
        }
     },
     components:{},
     render:...,
     directives:...,
     filters:...,
     computed:{
        myname:{
           get(){ return this.xx  },
           set(newValue){ this.$refs.xxx.src = newValue }   //在别的地方修改 this.myname = 'baidu.con',newValue就能获取到值
        }
     },
     watch:{ //监听的数据有变为就触发回调
         //遇到复合型数据推荐结构是[{},{}]
        str:function(new_value,old_value){
        },
        arr:{
            handler: function (val, oldVal) { /* ... */ }, //不要使用箭头函数,否则this无法指向vue对象
            deep: true  //遇到对象或者复合结构要开启深度监听,简单数组不需要开启
        },
        'obj.age':function (val, oldVal) { /* ... */ },
         obj:[
            function handle1 (val, oldVal) { /* ... */ },
            function handle2 (val, oldVal) { /* ... */ }
         ]
     },


     //生命周期
     beforeCreate:function(){
          //vue实例化前执行,data数据和dom还没有数据
     },
     created:function(){
          //vue实例化后执行,已经有data数据,但还没加载dom
     },
     beforeMount:function(){
          //组件内容渲染到页面前执行,data数据有了,dom还没在页面中
     },
     render:function(){
          //render执行顺序是在beforeMount和mounted之间,它的作用就是把DOM插入到页面上,所以到了mounted执行时我们才能看见数据
     },
     mounted:function(){
          //组件内容渲染到页面后执行,data和dom都在页面中了
     },
     beforeUpdate:function(){
          //只有当data数据发生变化后,但数据还没插入到dom的时候执行
     },
     updated:function(){
          //data数据变化完成并插入到dom之后执行
     },
     beforeDestroy:function(){
          //销毁之前回调,使用vm.$destroy()即是销毁了vm组件且先触发beforeDestroy之后是触发destroyed

     },
     destroyed:function(){
          //销毁后回调,这里的销毁后数据还是存在的,只是修改数据已经无法驱动修改视图变化了而已,
          //之前绑定在dom的事件例如click mouseenter等等还是有效的,仅仅是无法驱动视图变化而已,之前有的还是有
     },

     //activated和deactivated,只针对开启keep-alive的组件触发
     activated:function(){
        console.log("进页面")
     },
     deactivated:function(){
        console.log("离开页面")
     },

     //组件生命周期
     beforeRouteEnter(to, from, next) {
       //不能获取到this
       // do someting
       // 在渲染该组件的对应路由被 confirm 前调用
     },
     beforeRouteUpdate(to, from, next) {
       // do someting
       // 在当前路由改变,但是依然渲染该组件是调用
     },
     beforeRouteLeave(to, from ,next) {
       //能获取到this
       // do someting
       // 导航离开该组件的对应路由时被调用
       next()
     }
});
vue对象嵌套、加载顺序问题
对于新手或者是要投入项目的最好先搞清楚,方便之后的架构设计
1,情况:父对象id=xx,里面嵌套着子对象xx1,并且里面有相同元素{{a}}
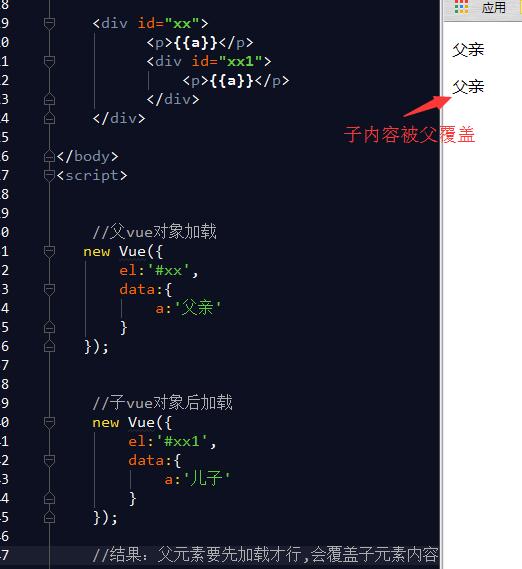
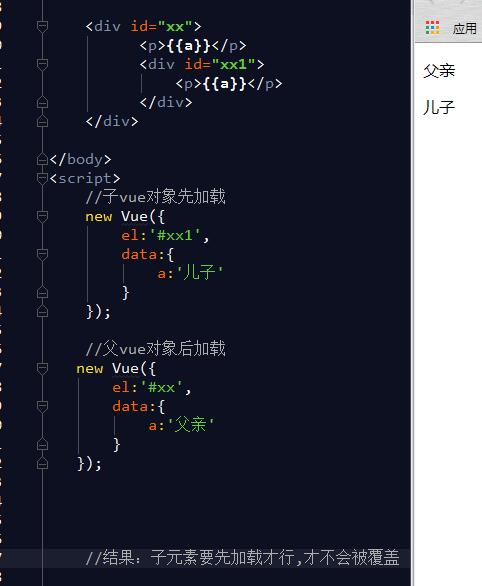
修改后
2,情况2:父元素里面嵌套着子元素,但子元素里面的{{a1}},父元素没有

修改后
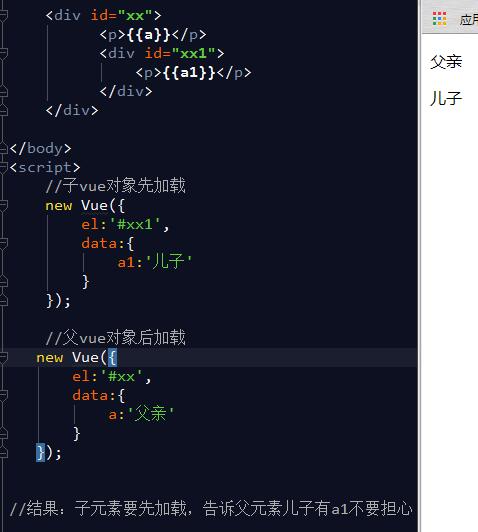
总结:
1,子元素有的属性,父元素一定要有;父元素有的属性,子元素可以不声明。
2,子元素要加载在父元素前面
//放在公共样式的最最前面
[v-cloak] {
   display: none !important;
}

<div id=“app” v-cloak>  </div>
vue数据的增、删、改
vue不允许添加额外属性,只能在已有的基础上修改,我们可以自定义一个空对象,在其基础上添加属性也能达到这样的效果。
var vm1= new Vue({
  el: '#repeat',
  data:{
    str:'',  //预留空的
    obj:{}   //预留空的
    obj1:{a:''}  //如果模板中要调用obj1.a,就要在vue实例中预先设置好,否则会报错。
 }
})
在修改数组、对象时也需要vue内置的方法去修改,如果还想有数据双向绑定效果就要用以下方法去修改。否则修改后的视图也不会改变。
对象
修改:
  Vue.set(vm1.obj,'age',123) //添加了age属性
  this.$set(this.someObject,'b',2)  //临时补加a属性且赋值,如果要删除使用this.$delete(this.someObject,'b')
   或
  vm1.str=xxxx //直接修改
添加:
  this.obj = Object.assign({}, this.obj, { a: 1, b: 2 }); //在obj对象上添加了a属性和b属性
  调用:{{obj.age}}
数组
data:{
 arr:['我的名字','是谢尔顿']
}

修改:
Vue.set(this.arr, 1, '陈陈')

修改长度
example1.items.splice(newLength)
- push()      //末尾加
- pop()       //末尾减
- shift()      //首减
- unshift()  //首加 ie8不支持
- splice()    //推荐使用,可增、删、改
- sort()       //升序
- reverse()  //降序
//以上方法会修改元数组


filter()
concat()
slice()
//以上方法,不会修改原数组,返回一个新数组
var example2 = new Vue({
  el: '#example-2',
  data: {
      items: [
        { message: 'Foo' },
        { message: 'Bar' }
      ]
  }
})
example2.items.push({ message: 'Baz123' })  //在items数组里插入对象

Vue.set(this.items,2,{name:’111’})   //找到数组this.items   在索引2的位置上添加数据  {name:’111’}
或者
this.arrys.splice(2,0,'吗132’)   //在数组中索引2的位置,插入一个数组内容为'吗132’
filter()
concat()
slice()
example1.items = example1.items.filter(function (item) {
  return item.message.match(/Foo/)
})
example2.items.$set(0, { childMsg: 'Changed!'})
this.arrys.splice(0,1)  //从第0个索引开始包括第0个索引,选1个元素开始删除
注意:$remove已经被弃用
$用法
vm.$data //获取到vm里面data设置的数据
vm.$el //获取到此id的原生DOM
vm.$options //vm.$options.render=(a)=>{ return a(‘div’,{},’文字’); } ,data属性里面的数字有更新就会触发该函数
还有更多$的方法
表达式
{{str}} //输出变量
表达式指出js语法
{{ number + 1 }}
{{ ok ? 'YES' : 'NO' }} //只能使用三元运算,不能使用if else
{{ message.split('').reverse().join('') }}
<div v-bind:id="'list-' + id"></div>
不解析表达式
<div v-pre>{{name}} </div> //直接输出 {{name}}
计算属性
计算属性主要是弥补解决{{}}表达式不能解决复杂的问题。
vue初始化时,有些属性需要在vue初始化后进行计算后才显示
什么时候需要计算属性?当一个值需要依赖另一个值变化而变化的时候就需要,尤其是对大数据的时候
<div id="example">
 a={{ a }}, b={{ b }}
</div>

var vm = new Vue({
  el: '#example',
  data: {
    a: 1
  },
  computed: { //计算属性里面的属性名调用时,直接写变量,如:{{b}}, 不能{{b()}}
    b: function () { //在计算属性里面定义的属性名可以直接在表达式中显示,b值依赖a,需要初始化时计算出b值这时候就需要计算属性
    // `this` 指向 vm 实例
       return this.a + 1 //a值变化,b值也会自动更新
    }

    //另一种写法:
    myname:{
       get(){ return this.xx  },
       set(newValue){ this.$refs.xxx.src = newValue }   //在别的地方修改 this.myname = 'baidu.con',newValue就能获取到值
    }
  }
})

结果:
a=1,b=2  (只有变量b被调用的时候,计算属性里面的函数才会去运行)
***注意:当使用v-model监听某个值时,页面中正好有一个表达式是类似是<p>{{xx()}}</p>,如果xx()如果是做了很复杂耗时的计算,推荐把xx方法写入到computed,中不然页面性能会大大降低。案例:indexaaa
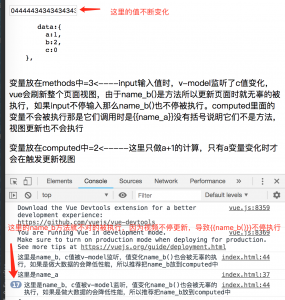
https://cn.vuejs.org/v2/guide/computed.html#%E8%AE%A1%E7%AE%97%E5%B1%9E%E6%80%A7%E7%9A%84-setter
还额外提供一个set属性
computed:{
    fullName:{
        get: function (){
            return this.firstName + ' ' + this.lastName
        },
        set: function (newValue) {
            //一旦this.fullName = '1122'属性有改变就会触发set
            this.firstName = newValue
            this.lastName = '改了'
        }
    }
},
表单
案例:test
模板
//需要控制大部分html显示、隐藏的 就把html都放入<template>里面
//v-show 不能用在 <template>上 也不支持 v-else
<template v-if="message">
  <h1>Title</h1>
  <p>Paragraph 1</p>
  <p>Paragraph 2</p>
</template>
<p v-else>No</p>


取代v-else的方法:
<p v-show="condition">YES</p>
<p v-show="!condition">NO</p>
(提示:频繁切换推荐使用v-show,因为v-if每次显示的时候都需要耗性能)
过滤器表达式
过滤器只能放在{{ }} 和 v-bind 中
{{ message | capitalize }}    //message的值传入到capitalize函数里面进行过滤处理后在返回
{{ message | filterA | filterB }}    //过滤条件可以叠加
{{ message | filterA (‘arg1', arg2) }}   //过滤传参数,默认第一个参数是message,‘arg1', arg2分别是第二、第三个参数
<li v-for="(value,index) in scroll_img" :class="value.xx | filterA">
   {{index}}
</li>
自定义过滤器
<p>{{name | time_style | add_year}}</p>  //name是数据,name数据会经过time_style、add_year的过滤

data:{
  name:new Date(),  //原始数据
},
filters:{
  time_style:function (value) {
    console.log(value); //这里的value就是new Date()
    return value.getHours()+':'+value.getMinutes()+':'+value.getSeconds()
  },
  add_year:function (value) {
    console.log(value); //这里的value是经过time_style处理过后返回来的值
    return "2017-"+value
  }
}
条件语句 (显隐)
//v-if是直接删除DOM来控制显隐
<p v-if="greeting">Hello!</p>
<p v-else>No</p>

条件可以这么写
<h1 v-if="yes">Yes!</h1>
<h1 v-if="no">No!</h1>
<h1 v-if="age >= 25">Age: {{ age }}</h1>
<h1 v-if="name.indexOf('jack') >= 0">Name: {{ name }}</h1>

var vm = new Vue({
  el: '#app',
  data: {
    yes: true,
    no: false,
    age: 28,
    name: 'keepfool'
  }
})


//v-show根据display: none;来控制显隐
<p v-show="message">YES</p>
<p v-else>No</p>


2.1.0 新增
<div v-if="type === 'A'">
A
</div>
<div v-else-if="type === 'B'">
B
</div>
<div v-else-if="type === 'C'">
C
</div>
<div v-else>
Not A/B/C
</div>
元素属性attr
data: {
 text:'text',
 value:'值',
 url:'http://baidu.com',
 a_title:'a连接'
}

<a v-bind:href="url" v-bind:title="a_title">aaa</a>
//<a href="http://baidu.com" title="a连接">aaa</a>

<input v-bind:type="text" v-bind:value="value">
//<input type="text" value="值">

<a v-bind:href="url"></a>
缩写:
<a :href="url"></a>
data(){
 msg:'内容'
 name:'titlexx',
 event:'click'
},
template:`<div :[name]="msg" @[event]="handle"></div>`,
methods:{
 handle(){
 }
}

效果:
<div titlexx="内容"></div>
class动态添加
在vue中添加class推荐使用v-bind:class来添加
对象方法:
(1)
 <div class="static" v-bind:class="{ 'class-a': isA, 'class-b': isB }"></div>
data: {
 isA: true,
 isB: false
}
结果:<div class="static class-a"></div>


(2)
<div v-bind:class="classObject"></div>
data: {
  classObject: {
   'class-a': true,
   'class-b': false
  }
}
数组方法:
<div v-bind:class="[classA, classB]">
data: {
  classA: 'class-a',
  classB: 'class-b'
}

<div class="class-a class-b"></div>
数组和对象
<div v-bind:class="[{'active':a},iserror]"> fasdfasdf </div>

data:{
  a:true,
  iserror:'name_class'
},

结果:<div class="active name_class"> fasdfasdf </div>


另一种表达式
<div v-bind:class="[classA, { classB: isB, classC: isC }]">
三元表达式
<div v-bind:class="[classA, isB ? classB : '']">
如果遇到负责判断推荐使用计算属性,如:
<input type="text" v-model="name" :class="class_array">

var app=new Vue({
  el:"#app",
  data:{
    a:true,
    b:false
  },
  computed:{
    class_array:function () {
                   return {
                      class_1: this.a && !this.b
                   }
                 }
  }
});
css样式
(推荐)对象方法:
<div v-bind:style="styleObject"></div>
data: {
  styleObject: {
    color: 'red',
    fontSize: '13px'
  }
}

数组方法:
<div v-bind:style="[styleObjectA, styleObjectB]">fff</div>
data: {
  styleObjectA:{color:'red'},
  styleObjectB:{fontSize:'13px'},
}


常规:
<img alt="" :style="'background:url('+val.cover_picture+') no-repeat center;border:0'">

结果都是:<div style="color: red; font-size: 13px;">fff</div>
都类似要学会举一反三
DOM事件
v-on:input  缩写 @input

<input type="text" @input="fn">  //fn写需要的逻辑判断

类似于jquery写法
$('.tx').bind('input propertychange', function() {
    document.title=$(this).val();
});
图片监听事件
<img :src="item.iconUrl" @error="errorImgfn" >

methods: {
    errorImgfn(e){
      e.target.src=require('@/assets/imgs/dbsx.png')
    },
}

或者
<img :src="item.iconUrl" :onerror="errorImg" >

 data () {
    return {
      errorImg: 'this.src="' + require('@/assets/imgs/dbsx.png') + '"'
    };
 },
同样也有@onload=""
案例:
methods:{
  click:function(e){
    console.log(this);
  }
}

<button v-on:click="click($event)">点</button>
缩写:<button @click="click($event)">点</button>
解除事件绑定:
vue不像jquery有unbind和off,但是可以利用一些小技巧去实现,例如:
<div id="app">
 <button @click="status && fn($event)">xxx</button>
 <p><button @click="bian">change</button></p>
</div>

new Vue({
 el:'#app',
 data:{
    status:true
 },
 methods:{
    fn:function (e) {
        console.log(e)
    },
    bian:function () {
        this.status=false;
    }
 }
});

//通过改变status变量去实现
常用:
@focus  //input 获取焦点
@blur   // 失去焦点
touch事件
长按,点击事件
<div @touchstart="gotouchstart()" @touchmove="gotouchmove" @touchend="gotouchend()"></div>
methods:{
       gotouchstart(img){
            touch_time=new Date()/1000; //记录手指放在屏幕上的时间
            temp_time=0;
            run_fn=null;
            clearTimeout(run_fn);
           run_fn= setTimeout(function () {
               Tools.dialog.strHtml('<div><img style="display: block;width: 70%;" src="'+img+'"> </div>');
            },800);
        },
        //手释放,如果在800毫秒内就释放,则取消长按事件,此时可以执行onclick应该执行的事件
        gotouchend(num){
            var self=this;
            if(  Math.ceil( ((new Date()/1000)-touch_time)*100  )/100>0.8  ){
               // console.log('长按');

            }else{
                clearTimeout(run_fn);
                self.gokill(num);
            }
        },
        //如果手指有移动,则取消所有事件,此时说明用户只是要移动而不是长按
        gotouchmove(){
            clearTimeout(run_fn);
        },
}
指令修饰符
<a v-bind:href.literal="url" v-bind:title="a_title">aaa</a>
直接显示 <a href="url" title="a连接">aaa</a> //href直接显示属性名

禁止默认行为
<button v-on:submit.prevent="onSubmit"></button> //相当于加了event.preventDefault()

<a @click.stop=“"> </a> //阻止事件冒泡
<div @click.self></div> //只有该元素触发,不包括子元素
1,事件修饰符
.stop //阻止事件冒泡
.prevent //阻止默认行为,例如点击a会自动跳页面,点击<input type=“submit”>会刷新提交数据
.capture //一般事件都是在冒泡时候被执行的,addEventListener(‘click’,fn,true) ,添加此修饰符相当于改成了true,默认是false
.self //例如当父元素绑定了click,父元素里面又有一个子元素,当点击了子元素时候,其实同时也点击了父元素因为父元素包裹着子元素嘛,click触发。当给父元素添加.self时,在点击子元素时候,就不会出发click了。也有阻止冒泡的效果,相当于e.currentTarget
.once //2.1.4 新增,只触发一次事件
.native // v-on:click.native,这样触发的就是js原生的click事件了而不是vue封装好的事件

<a v-on:click.stop="doThis"></a> //阻止默认行为
<a v-on:click.stop.prevent="doThat"></a> //同时阻止默认行为和事件冒泡
<form v-on:submit.prevent></form> //只添加修饰符 ,不添加其他参数
2,键盘修饰符
<!-- 同上 -->
<input v-on:keyup.enter=“fn”> //当input获取焦点时候,按回车就会触发fn事件,对外调用就是
vm.fn()事件

<!-- 缩写语法 -->
<input @keyup.enter=“fn">
或者
<input @keyup.13="fn" type="text”>

按键组合
<input @keyup.ctrl.67="fn" type="text”> //获取input焦点后同时按住ctrl+c 就能触发fn函数


键盘别名
enter
tab
delete
esc
space
up
down
left
right
ctrl
alt
shift
meta (mac是command,win是windows)

自定义别名
Vue.config.keyCodes.huiche=13
3,数据同步修饰符
lazy //效果都是同步,但是只有在input失去焦点时候才同步数据
number //将字符串的数字转化为数字类型,如果是NaN直接显示此数据,例如是abc123,说明是NaN,那就直接显示abc123
trim //自动去掉 首尾空格


举例:
<input v-model.lazy="msg">
<input v-model.number="msg">
<input v-model.trim="msg">
属性监听$watch
https://cn.vuejs.org/v2/api/#watch
var vm = new Vue({
   el:'#app',
   data:{
       str:'你好',
       arr:[],
       obj:{
           a:''
       }
   },
   watch:{
      str:function(new_value,old_value){
      },
      'obj.a':{
         handler: function (new_value,old_value) { /* ... */ }
      }
      //或者
      'obj':{
         handler: function (new_value,old_value) { new_value.a },
         deep: true, //深度监听
         immediate: true //true时,默认执行一次handler函数
      }
   }
});

或者
https://cn.vuejs.org/v2/api/#vm-watch
vm.$watch('str', function (new_value,old_value) { //属性值发生改变就会触发

},{
  deep: true
});

//注意如果直接监听整个对象arr或者obj,old_value返回来的值跟new_value是一样的
input监听
两种方法
1,v-on:input
<input type="text" v-on:input ="inputFunc($event)">

methods:{
   inputFunc:function (e) {
      document.title=e.target.value;
   },
}
2,watch
<input type="number" :value="buy_num" v-model="buy_num">

data:{
   buy_num:0
},
watch:{
   buy_num:function(){
         console.log(this.buy_num);
   }
}
循环、遍历
数据:
data:{
   array:['陈陈',20,'男'],
   obj:{
     xx1:'数字1',
     xx2:'数字2',
     xx3:'数字3'
   },
}
数组:
<ul>
 <li v-for="(value,index) in array">
    索引:{{index}}----值:{{value}}
 </li>
</ul>

对象:
<ul>
 <li v-for="(value,key,index) in obj">
   属性名:{{key}}---
   值是:{{value}}---
   索引是{{index}}
 </li>
</ul>

复合数据:
data:{
    scroll_img:[
     {img_name:1},
     {img_name:2},
     {img_name:3},
     {img_name:4}
    ]
},
methods:{
    remove_li:function (index) {
       this.scroll_img.splice(index,1)
    }
}
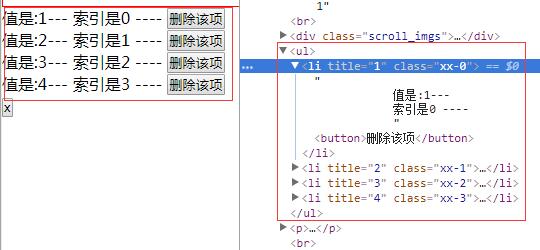
对象和数组:
<ul>
 <li :class="'xx-'+index" :title="value.img_name" v-for="(value,index) in scroll_img">
   值是:{{value.img_name}}---
   索引是{{index}} ----
   <button @click="remove_li(index)">删除该项</button>
 </li>
</ul>
v-for互嵌
data:{
  scroll_img:[
    {img_name1:1},
    {img_name2:2},
    {img_name3:3},
    {img_name4:4},
  ]
}


<ul>
 <li v-for="(value,index) in scroll_img">
   索引:{{index}}---
   <span v-for=" (val,key,index) in value"> 属性:{{key}} </span>---
   <span v-for=" (val,key,index) in value"> 值:{{val}} </span>
 </li>
</ul>

v-for 筛选、过滤
在遍历的同时不希望有些数据显示出来
1,//v-bind:class方法,给不需要显示的数据添加指定class名隐藏或者添加test自定义过滤方法
<li v-for="(value,index) in scroll_img" :class="!!value.xx?'gg':'mm' | test">
   索引:{{index}}---
</li>
2,//v-show方法,跟v-bind:class效果类似仅仅是隐藏,dom还是存在的
3,//v-if,直接把不希望显示的数据删除
<li v-for="(value,index) in scroll_img" v-if="!value=='xx'">  //遍历出来的value值如果等于xx字符串就不显示
  索引:{{index}}---
</li>
4,通过计算属性在过滤后才把值带入到v-for中遍历
v-for排序:升序、降序
如果希望遍历的值根据某个字段降序或者升序,要先通过计算属性排列好才带入到v-for循环中
:key重新渲染
案例:
默认情况使用v-for渲染列表时,在每个input输入内容,如下
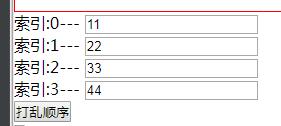
在点击“打乱顺序”,reverse(),视图上并没有发生任何变化,其实dom结构已经发生了变化,如图:

所以需要强制在更新一次排序视图才能同步更新,给遍历input的dom结构添加一个:key=”index”属性,index必须是唯一不能重复,添加之后在点击“打乱顺序”,

如果在使用v-for遍历数据时,如果数据发生了变化但是视图没变可以尝试使用:key来解决。
https://cythilya.github.io/2017/04/27/vue-list-rendering/
生命周期
vue的一系列执行过程,其实都通过以下的钩子(回调函数)捕获到,同时也可以通过钩子在我们需要的某时刻添加我们需要的功能。
(1)第一次刷新页面加载时都会触发到以下钩子:
beforeCreate   //常用,添加类似loding效果
create   //常用,在数据显示到视图时,在额外添加数据到vm.$data中
beforeMount
mounted   //常用,有时需要获取dom,或者把接口的数据插入到dom中
(2)数据发生改变时:
beforeUpdate
updated   //常用,数据发生改变后回调
(3) 销毁(就是停止数据的双向绑定效果)vm.$destroy()
beforeDestroy
destroyed  //常用,销毁后回调
虽然生命周期经历过这几个步骤,但是常用的也就那么几个。
组件封装(重点)
自己一个经典案例:《vue树节点创建以及增删改》
作用就是可以重复性的利用代码,例如选项卡组件可以在同一个页面下 多次使用。
组件分:全局 和 局部
1,全局
var myComponent = Vue.extend({
  template: '<div>This is my first component!</div>’ //这个是子组件,组件必须要有一个容器div包裹着才行
})
// 2.注册组件,并指定组件的标签,组件的HTML标签为<my-component>
Vue.component('my-component', myComponent)  <---全局组件声明方法

或者

Vue.component('my-component',{
   template: '<div>This is my first component!</div>’ //这个是子组件,组件必须要有一个容器div包裹着才行
})

//全局组件声明一定要写在new Vue实例对象的前面不然就出错

new Vue({
 el: '#app'
});
调用:
<div id="app">
  <!-- 3. #app是Vue实例挂载的元素,应该在挂载元素范围内使用组件-->
  <my-component></my-component> //调用组件,放在哪个vm容器下就在哪个vm显示,这个是父组件
</div>
2,局部
new Vue({
   el: '#app',
   components: {
      'my-component' : {
          template:'<div> <button @click="fn">按钮1</button> <p>{{value}}</p> </div>'
      }
   }
});


或者

var myComponent = Vue.extend({
  template: '<div>This is my first component!</div>'
})

new Vue({
  el: '#app',
  components: {
    // 2. 将myComponent组件注册到容器#app实例下,也就只有此vm容器内部可以使用其他的容器不行
   'my-component' : myComponent
  }
});
调用:
<div id="app">
   <!-- 3. my-component只能在#app下使用-->
   <my-component></my-component>
</div>
以上发现一个问题如果在组件复杂的时候template需要很多html就很麻烦且不好写,
可以利用<script type=”text/x-template” id=”page”>
案例:
<script type="text/x-template" id="page">
 <ul>
   <li></li>
 </ul>
</script>

Vue.component("page",{ template:"#page"})

或者

template:'<div>\
           <h2>我是子组件的标题</h2>\
           <slot>\
             只有在没有要分发的内容时才会显示。\
           </slot>\
          </div>'
特殊dom结构 使用is
例如table的结构都是固定的,要基于这样固定结构模板来写组件要这么做
<table>
  <tbody is="my-component"></tbody>  //这里的tbody会被模版替代
</table>

Vue.component('my-component',{
 template:'<tbody><tr><td>123</td></tr></tbody>'
});
效果:
<table><tbody><tr><td>123</td></tr></tbody></table>
类似的还有ul ol select
*注意:不推荐使用table表格里面嵌套vue代码会报错,尤其是ie10以上浏览器。推荐使用div+css去模拟table表格
.vam { display: table; border-collapse:separate;border-spacing: 5px; } //table
.vam>div { display: table-row; }  //tr
.vam>div>div { display: table-cell; vertical-align: middle; }  //td

<div class="vam">
    <div>
        <div> </div>
    </div>
</div>
组件继承
//组件继承使用场景,可以把多组件使用比较多的方法独立封装成一个公共组件,其他组件在去调用,避免写重复代码。
<div id="root">

</div>

var a={
   template:`<div>123---{{xxx}}</div>`
}

var x=Vue.extend(a);

new x({
  el:'#root',
  data:{
     xxx:'aaa'
  }
});
//父组件
var a={
  template:`<div>123</div>`,
  mounted(){
     console.log('a父亲');
  }
}


//子组件
var b={
  extends:a, //子继承父
  template:`<div>456</div>`, //子模板覆盖父模板
  mounted(){
    console.log('b子');
    this.$parent.$options.name //打印出实例化对象的name属性值
  }
}

  实例化方法1:
  var c=Vue.extend(b);  //组件b插入到Vue对象中
  new c({
    el:'#root'
  });

  实例化方法2: //推荐使用这种写法
  new Vue({
      name:'root',
      el:'#root',
      components:{
          diycomponent:b
      },
      template:'<diycomponent></diycomponent>'
  });

//结果
a父亲
b子
parent案例:
var a={
  template:`
   <div>
     <div>{{haha}}---{{baba}}</div>
   123</div>
  `,
  props:['baba']
}


var b={
  extends:a, //b组件继承a组件
  data:function () {
    return {
       haha:'给父组件传参'
    }
  }
}

var xx=new Vue({
  name:'xx',
  data:{
    a1:'11',
    b2:'22'
  }
});


new Vue({
  parent:xx, //继承xx的new Vue对象
  el:'#root',

  components:{
    com:b //引入组件b
  },
  template:'<com :baba="this.$parent.a1"></com>', //将组件渲染出来
  mounted:function () {
      console.log( this.$parent.a1 ); //获取到指定父元素的值,可以获取不推荐去修改
  }
});
组件传参 (重点)
要向组件中的template模板传值,只能靠组件中的data和props
prop 是单向绑定的:当父组件的属性变化时,将传导给子组件,但是不会反过来。
//以下是子组件
Vue.component('todo-item', {    //组件要放在最前面不能放在new Vue后面
    template: ‘<li v-show=“num">This is a todo{{num}}------{{value1}}-----{{value2}}</li>’,   //子组件
    data:function () {  //传递参数,这里要使用function
       return {num:0}  //返回的也必须是对象
    },
    props:['value1','value2’]  //父组件要传值给子组件就必须在props里面声明变量
})
//以上是子组件

var vm = new Vue({
  el: '#app’,
  data:{
    parentMsg:’字符串'
  }
});

<div id="app">
  <ol>
    //如果要获取到vue实例对象里面的数据就要使用v-bind,以下parentMsg就是vue实例对象中data的数据
    <todo-item value1="参数1" v-bind:value2="parentMsg"></todo-item>  //<--这个是父组件
  </ol>
</div>
其实就是v-model和参数结合
<input type="text" v-model="parentMsg">
<my-dir v-bind:value1="parentMsg"></my-dir>  //value1是子组件里面的props里的属性,parentMsg是vue实例化对象中data里的数据
3,传递数据类型
用v-bind 和 不用的区别
<my-dir value1="1"></my-dir> //这时候传递的是字符串类型
<my-dir v-bind:value1="1"></my-dir> //这时候传递的是数字类型

<my-dir value1="[1,2]"></my-dir> //传递给模板的数据类型仅仅是字符串
<my-dir :value1="[1,2]"></my-dir> //传给模板的数据类型是数组
4,参数验证
限制父组件参数传入的类型,或者自定义传入参数的验证方法 。这些主要组件给别人用时做的限制。
例如:
props:{
 value1: {
   type: Number,
   default: 100
 },
 value2:Number,
 value3:[String,Number],
 value4:{
   type:Boolean,
   required:true
 },
 value5:{
   type:Array,
   default:function(){
     return [];
   }
 },
 value6:{
   validator:function(value){ //自定义验证,value6=“11” 传入的值必须大于10
      return value>10
   }
 }
}
除了以上类型还有 Object 、Function
案例:
<my-dir value1=“1″></my-dir> //这样限制了value1传入的类型,必须是数字类型,如果组件没设置value1属性,那么默认出入值为100
还有更多请参考api
5,子组件传参数给父组件
父组件可以通过props传参数给子组件,子组件可以通过以下方法做到,就必须使用自定义事件
$on(eventName) 监听事件 //适用在不同组件之间传参使用
$emit(eventName) 触发事件 //适用子组件传参给父组件。例如$emit(‘click’,data)该方法都写子组件中 ,这里的click是父组件中,data是子组件要传给父组件的数据
$once只有触发一次
直接看例子:
<my-component @on_jia="get_num" v-on:on_jian="get_num"></my-component>
<p>这里的str是vue实例化对象里面的数据:{{str}}</p>


Vue.component('my-component',{
 template:'<div><button @click="jia(num)">+</button>-----<button @click="jian(num)">-</button></div>',
 data:function () {
     return {num:0}
 },
 methods:{
   jia:function (value) {
     value=value+1;
     this.num=value;

     this.$emit('on_jia',this.num);
   },
   jian:function (value) {
     value=value-1;
     this.num=value;
     this.$emit('on_jian',this.num);
   }
 }
});


var vm=new Vue({
 el:'#app',
 data:{
   str:0
 },
 methods:{
   get_num:function (value) {
      this.str=value;
   }
 }
});
最终效果:把组件里面的参数值传给了实例化对象
过程:
1,子组件里面通过 this.$emit(自定义方法,参数) 自定义一个方法,并把参数带进去。
2,父组件通过v-on监听,子组件自定义的方法,并触发一个回调事件get_num,get_num负责把子组件参数获取过来。(中介作用)
3,在vue实例化对象中,在methods里面同样声明一个get_num并获取到,父组件传过来的数据。
$on使用
<div id="xx">
     <div @click="haha()">s</div>
</div>


<script>
    // click事件->haha->$emit->$on->diyclick->geth
    new Vue({
        el:'#xx',
        data(){
            return{
                a1:'初始数据'
            }
        },
        created(){
            //$on可以为一个自定义事件定义多个方法,遇到复杂的逻辑可以这样处理不需要都写在一起。
            //一个事件多个方法按上到下顺序执行
            this.$on('diyclick',this.geth);
            this.$on('diyclick',this.geth_1);

            //也可以在同一个函数上自定义多个自定义事件,打印看看this._events
            //this.$on(['diyclick_1','diyclick_2'],this.geth);
        },
        methods:{
            geth(e){
                console.log(this.a1,e); //this.a1 是$on自己的数据,e是顺带了$emit的数据
            },
            geth_1(e){
                console.log('这里是geth_1数据',e);
            },
            haha(){
                this.$emit('diyclick','$emit自己的数据');
            }
        }

    })
</script>
6,不同组件之间的传参(非父子关系) 跨组件传参
描述:两个组件,分别在不同的vue实例中,实现相互之间的传递参数,借助一个第三个空的vue实例和$emit、$on
//创建/src/eventbus.js
import Vue from 'vue'
export default new Vue()


//子组件1
<button @click="fn">1</button>
import Eventbus from '@/eventbus'
export default {
  name: "test1",
  methods:{
    fn(){
      Eventbus.$emit('send',{a:1})  //发送参数
    }
  }
}


//子组件2
import Eventbus from '@/eventbus'
export default {
  name: "test2",
  mounted() {
    Eventbus.$on('send',(e)=>{
      console.log(e)  //接收到{a:1}
    })
  }
}
7,组件数据共享
其实只要在全局环境中 声明一个对象,在组件的data里面引用即可
var obj={num:0}
data:function(){
 return obj
}
8,父组件传值给子组件里的计算属性
<my-component :value="1"></my-component> //父组件 传一个 数字类型 值为1 给子组件

Vue.component('my-component',{
 template:'<div>{{xx}}</div>’, //计算属性的结果给 模板
 props:['value'],
 computed:{
   xx:function () {
     return this.value+2; //获取父组件的参数 并 参数计算后在把结果传给模板
   }
 }
});
9,子组件直接获取,组件所在的vue实例对象里面的data数据
<div id="app"> <xx></xx> </div>

Vue.component('xx',{
  template:'<a> </a>',
  methods:{
      fn:function(){
           this.$parent.num   //num是实例对象里面的数据
      }
  }
});


new Vue({
   el:'#app',
   data:{
      num:0
   }
});
父组件直接获取子组件数据是用this.$children ,会遍历出所有的子组件
10, new Vue实例对象直接获取子组件的data数据,可以在父组件上用ref=””,如下案例:
<div id="app"> <xx ref="comA"></xx>  <a @click="fn"></a> </div>  //给组件取名字,方便快速定位

Vue.component('xx',{
 template:'<a> </a>',
 data:function(){
    return {num:0}
 }
});


new Vue({
 el:'#app',
 methods:{
     fn:function(){
          this.$refs.comA.num  //num是子组件的数据
     }
 }
});
*注意如果在父组件里的子节点使用ref是获取到dom元素,如:
<xx ref="comA"> <span ref="comB">111</span>  </xx>

this.$refs.comA.num  //num是子组件的数据,打印0
this.$refs.comB //打印 dom元素 <span ref="comB">111</span>
11,孙子获取爷爷数据,provide / inject
//孙子组件
var onecomponent={
  template:`<div> 345 </div>`,
  inject:[
     'yeye',
     //'data'
  ],
  mounted(){
     console.log( this.yeye.baba );
    //console.log( data.baba );
  }
}


//儿子组件
var component_temp={
  template:`
    <div> <slot baba="baba22"></slot> <haha></haha> </div>
  `,
  data(){
    return{
      xx:'11'
    }
  },
  components:{
    haha:onecomponent //引入孙子组件
  },
  props:['value1']
}


new Vue({
  el:'#root',
  provide:function(){

    //这里代码,防止低版本的vue,孙子在获取爷爷数据时候,没有双向数据绑定效果而写的
        // var data={}
        // var _this=this;
        // Object.defineProperty(data,'baba',{
        //     get:function () {
        //         return _this.baba
        //     },
        //     enumerable:true
        // })
    return{
     yeye:this,
     // data:data
    }
  },
  components:{
     com:component_temp
  },
  template:'<com ref="x"> <p slot-scope="diy">{{diy.baba}}</p> </com>', //爷爷组件
  data:{
    baba:'baba11' //孙子要获取爷爷的数据
  }
});
父子组件方法调用
vue 父调用子方法
子:
mounted(){
  this.$on('bridge',(val)=>{
    this.childAction(val);
  });
  ///此时通过$on进行监听中间桥接函数bridge对目的方法childAction进行触发
},
methods:{
  childAction(val='hello world'){
    console.log(val) //得到爸爸传来的数据
  }
}
父:
<Category ref="category"></Category>

<el-button @click="addcate()">修改分类</el-button>
addcate(){
  this.$refs.category.$emit('bridge','这里是要给儿子的数据');
}
子调用父亲
(1)通过this.$parent.event来调用父组件的方法
父组件
methods: {
 fatherMethod() {
   console.log('测试');
 }
}
子组件
mounted() {
  this.$parent.fatherMethod();
}
(2)子组件里用$emit
父组件
<child @fatherMethod="fatherMethod"></child>

methods: {
   fatherMethod() {
     console.log('测试');
   }
}
子组件
this.$emit('fatherMethod'); //调用
(3)父组件把方法传入子组件中,在子组件里直接调用这个方法
父组件
<child :fatherMethod="fatherMethod"></child>
methods: {
      fatherMethod() {
        console.log('测试');
      }
}
子组件
props: {
 fatherMethod: {
   type: Function,
   default: null
 }
},
mounted(){
  if (this.fatherMethod) {
      this.fatherMethod();
  }
}
动态组件 (类似选项卡)
需要特殊<component v-bind:is=”str”></component>
其实也就是多个组件项目切换 显示
<div id="app">
   <a @click="fn('comA')"></a>
   <a @click="fn('comB')"></a>
   <component v-bind:is="str"></component>  //str显示哪个组件名就显示那个组件
</div>


var vm=new Vue({
  el:'#app',
  data:{
     str:'comA'
  },
  methods:{
      fn:function(value){
          this.str=value;
      }
  },
  components:{
     'comA':{
          template:'<a>1</a>'
     },
     'comB':{
          template:'<a>2</a>'
     }
  }
});
<keep-alive>
   <component :is="currentView">
      <!-- 非活动组件将被缓存! -->
   </component>
</keep-alive>
异步组件
有些组件可能要从别的地方获取数据后才显示出来,这时候肯定考虑异步
<div id="app">
    <com ref="haha"></com>
    <button @click="fn">点我</button>
    <p>{{str}}<p>
</div>
var vm=new Vue({
 el:'#app',
 data:{
   str:''
 },
 methods:{
   fn:function(value){
     this.str=this.$refs.haha.num;
   }
 },
 components:{
   'com':function (a,b) {

        $.ajax({
           url:'http://localhost/test_duble_data.html',
           success:function () {
             a({
                template:'<div>xx</div>',
                data:function(){
                   return {num:'子组件传来的数据'}
                }
             });
           }
        });

    }
 }
});
强制更新,实现数据双向绑定效果
html:
<div id="root">
  <div>{{text}}--{{obj.a}}</div> //正常来说如果要在模板中使用obj.a,那么在vue实例中就要预先声明obj中的a变量即使是空值也好。
</div>
var app=new Vue({
  el:'#root',
  // template:'<div>{{text}}--{{obj.a}}</div>',
  data:{
    text:0,
    obj:{} //但是在obj中并没有预先声明a变量,就算在后面临时赋值obj.a=xxx,在模板中调用也不会有值显示。
  }
 });

 var i=0;
 setInterval(()=>{
   i++;
   app.obj.a=i; //临时给a赋值
   app.$forceUpdate(); //如果要为临时设置的也实现双向绑定就要强制更新组件。(不太推荐)
   //如果没有临时预设属性,又不想使用强制更新,可以使用app.$set(app.obj,'a',i),作用是临时补上a属性到data中
 },1000)
DOM回调函数
按理来说我们使用vue是不需要操作dom的,但是偏偏可能我们在做一些动画效果时,就是要需要等dom加载完成后才去执行
<div id="app">
   <div id="haha" v-if="num">数据</div>
   <button @click="fn">点我</button>
</div>

var vm=new Vue({
  el:'#app',
  data:{
     num:false
  },
  methods:{
     fn:function(){
          this.num=true;
          this.$nextTick(function(){ //等待#app容器下的dom加载完成后才执行以下代码

              $('#haha').text();
          });
     }
  }
});
slot内容分发 (插槽)
把这个理解为父组件往子组件传值的另一种方法就行。
或者理解为,在父组件里面写的html想要在子组件渲染出来就需要到slot
//在父组件的<my-component></my-component>标签里面加内容
<div id="app">
  <my-component> //这个是父组件,以下内包裹的就是要传给子组件的内容
    <p slot="header">头部1</p>
    <p slot="header">头部2</p>
    <p>主体内容1</p>
    <p>主体内容2</p>
    <p slot="foot">底部1</p>
  </my-component>
</div>


<script>
//要显示出父组件加的内容就需要到slot标签
Vue.component('my-component',{
  template:'<div> ' +
            '<slot name="header"></slot> ' +
            '<slot></slot> ' +
            '<slot name="foot"></slot> ' +
            '<slot name="foot2">父组件没传值就默认显示我</slot> ' +
           '</div>'
  });


 new Vue({
  el:'#app'
 });

</script>


//渲染效果
<div id="app">
  <div>
    <p>头部1</p>
    <p>头部2</p>
    <p>主体内容1</p>
    <p>主体内容2</p>
    <p>底部1</p>
    父组件没传值就默认显示我
  </div>
</div>
1,父组件my-component包裹着内容就是要传给子组件的
2,子组件要接收父组件传来的值就要使用<slot></slot>
3, 子组件的<slot name=”xx”>使用name就只能指定接收父组件的<dom slot=”xx”></dom>
父组件可以使用多次<dom slot=”xx”></dom>,子组件也可以接收多个,只要一一对应
4,如果子组件有<slot name=”xx”>设置默认值</slot>,而父组件没有传值来,子组件可以显示默认值
5,只要子组件没有为slot设置name的,父组件的其他内容就默认替换
slot传参 (作用域插槽)
slot结合template使用,子组件传参给父组件,在子组件的slot标签上自定义参数,父组件接收参数时使用scope=””
<my-component>
  <template slot="xx" scope="xxx">
     <p>123</p>
     <p>{{xxx.msg0}}</p>
     <p>{{xxx.msg1}}</p>
  </template>
</my-component>


<script>

Vue.component('my-component',{
  template:'<div> <slot name="xx" :msg1="str" msg0="内容123"></slot> </div>',
  data:function () {
    return {str:'子组件内容'}
  }
});


new Vue({
 el:'#app'
});

</script>
//渲染效果
<div id="app">
  <div>
     <p>123</p>
     <p>内容123</p>
     <p>子组件内容</p>
  </div>
</div>
如果slot没有结合使用<template>时,子组件传参给父组件时,父组件接收参数要使用slot-scope=””
//子组件
template:`
<div> <slot baba="baba22"></slot> </div>
`

//父组件
template:'<com> <p slot-scope="diy">{{diy.baba}}</p>  </com>',  //父组件接收参数要用slot-scope
$slots
可以利用$slots来获取到父组件传来的slot具名,例如可以获取到父组件传来的dom元素
<my-component>
  <p id="nimei" slot="xx">xxx</p>
</my-component>

Vue.component('my-component',{
  template:'<div> <slot name="xx" :msg1="str" msg0="内容123"></slot> </div>',
  data:function () {
     return {str:'子组件内容'}
  },
  mounted:function () {
    document.title=(this.$slots.xx)[0].elm.id  //获取到父传来的slot="xx"的dom元素,也就是id="nimei"的p元素
  }
});
内联模板
之前介绍slot,在父组件包裹里面写数据就默认相当于参数要传给子组件,
我们也可以不在子组件里的template里面写div,可以直接把父组件里面的
数据当做模板。
<div id="app">
 <my-component inline-template> //inline-template告诉父组件,里面内容是当成模板使用,而不是当成slot内容分发给子组件
   <div> //跟子组件的template一样写模版最外层同样也要包裹着一个div容器不然没效果
     <p>父组件里面的内容就相当于模板了</p>
     <p>{{msg}}</p>
     <p>{{message}}</p>
     <p>{{aa}}</p> //这里优先使用子组件的数据
   </div>
 </my-component>
</div>


<script>

Vue.component('my-component',{
 data:function () {
   return {msg:'子组件',aa:'子组件的aa'}
 }
});

new Vue({
  el:'#app',
  data:{
    message:'父组件',
    aa:'父组件的aa'
  }
});

</script>
动态生成vue实例
vue实例都是我们最开始使用new Vue()来实现了,但有时候我们也需要动态是生成。
<div id="app">
  <button @click="fn()">动态挂载vue对象</button>

  <div id="app2">

  </div>
</div>


<script>

var myvue=Vue.extend({
  template:'<div><input type="text" v-model="haha"><p>{{haha}}</p></div>',
  data:function () {
      return {haha:''}
  }
})


new Vue({
 el:'#app',
 data:{
 message:'父组件',
    aa:'父组件的aa'
 },
 methods:{
   fn:function () {
     new myvue().$mount('#app2');
   }
 }
});
</script>
自定义指令
<div id="app">
 <input type="text" v-focus="{haha:'笑哈哈'}">
</div>

<script>
    //以下是全局
    Vue.directive('focus',{
        bind:{},
    });


    //以下是局部 自定义指令
    new Vue({
        el:'#app',
        directives:{
            focus:{
                bind:function (el,binding) {  //仅仅执行一次,作用就是为绑定的元素,添加初始化值。
                    el.value=1
                    el.className='nihao';
                    el.addEventListener('click',function () {
                        console.log('绑定');
                    });
                    console.log(el);  //笑哈哈
                    el.xx=123;  //要想其他钩子函数都能调用到,就把要公用的属性和方法都写在el中
                },
                inserted:function (el,binding) {  //dom加载完成后,就调用
                    el.focus();
                    console.log(el.xx);  //123
                },
                update:function (el,binding,vnode,oldVnode) {

                },
                componentUpdated:function (el,binding,vnode,oldVnode) {

                },
                unbind:function (el,binding) {

                }
            }
        }
    });

</script>
render函数 虚拟dom vue创建html
template:'<div ref="x"></div>' //template里面的html,最终还是靠render函数显示到页面上的
等价
render(createElement){
        return createElement('div',{
            ref:'x'
        });
},
具体更多用法参考:https://cn.vuejs.org/v2/guide/render-function.html
**注意:能用template创建html就尽量用,否则使用render创建html会增加难度。
使用场景是:当模板出现重复性比较高时可以考虑使用,例如:
<script type="text/x-template" id="xx">
  <div>
    <h1 v-if="show">
      <a></a>
    </h1>

    <h2 v-if="show">
      <a></a>
    </h2>

     <h3 v-if="show">
      <a></a>
     </h3>

     <h4 v-if="show">
      <a></a>
     </h4>
  </div>
</script>
如果出现类似以上的重复性出现的dom就考虑使用虚拟dom进行遍历了。
对比学习效率会比较高
template:'\
         <div id="ele"> \
           :class="show:show" \
           @click="fn">内容</div>'

比较

render:function(createElement){
   return createElement(
             'div',
             {
               class:{'show':this.show}
               attrs:{id:'ele'},
               on:{click:this.fn}
             },
             '内容'
          )
   }
可读性明显template比render好,所以要看情况使用虚拟dom不然会带来不便。
上面的案例都知道传进来的createElement参数才是最关键的,而这个参数是一个函数,
函数里面又有3个参数
createElement(
  {string|object|function}, //必选 (根据逻辑判断生成不同的dom元素标签)
  {object}, //可选 (数据填充,第二个参数玩法很多)
  {string|array} //可选 (子节点)
)