会自动帮我们格式化一些代码,让代码阅读尽量统一。
以下工具都内置支持editorconfig无需插件,在根目录创建.editorconfig就行

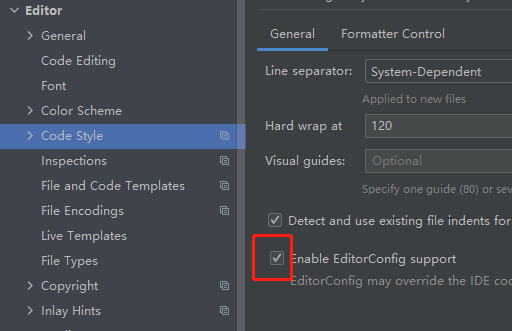
webstorm配置参数
会自动帮我们格式化一些代码,让代码阅读尽量统一。
以下工具都内置支持editorconfig无需插件,在根目录创建.editorconfig就行
webstorm配置参数
plopfile.js功能类似于像创建一个xx.html的空模板,模板里面的有固定的初始化数据。
安装:
npm i -g plop@2.5.0 //3.x是typeScript的
根目录创建:plopfile.js
module.exports = function(plop) {
    // controller generator
    plop.setGenerator('controller', {
        description: '控制器',
        prompts: [
            {   //第一个操作
                type: 'input', //输入一个值
                name: 'name',  //变量名是name
                message: 'controller name please'
            },
            {   //第二个操作
                type: 'checkbox', //多选
                name: 'blocks',  //数组变量名是 blocks:['state','mutations','actions']
                message: 'Blocks:',
                choices: [
                    {
                        name: 'state', //外显示名字
                        value: 'state',
                        checked: true //默认选中
                    },
                    {
                        name: 'mutations2',
                        value: 'mutations',
                        checked: true
                    },
                    {
                        name: 'actions3',
                        value: 'actions',
                        checked: true
                    }
                ],
                validate(value) { //验证是否必填
                    if (!value.includes('state') || !value.includes('mutations')) {
                        return 'store require at least state and mutations'
                    }
                    return true
                }
            }
        ],
        actions(data) {
            console.log(data) //之前操作获取到的数据 { name: '00', blocks: [ 'state', 'mutations', 'actions' ] }
            const name = '{{name}}' //第一个操作 设置的变量
            const actions = [
                {
                    type: 'add',
                    path: `src/${name}.vue`,
                    templateFile: 'plop-templates/controller.hbs'
                }
            ]

            return actions//返回数组
        }

    });

};
https://plopjs.com/documentation/
官网githun:https://github.com/plopjs/plop/tree/v2.5.0
更多有关prompts参数设置可以参考:https://github.com/SBoudrias/Inquirer.js/
下载文件plop,解压把文件都放在根目录,之后执行npm run new即可。
原因是gulp 3.x不能在node.js 10以上的版本运行
解决方法一:安装nvm把node.js切换到10.x
方法二:编辑package.json
"scripts": {
  .
  .
  "preinstall": "npx npm-force-resolutions"
},
"resolutions": {
  "graceful-fs": "^4.2.4"
},
接着重新npm install
如果还不成功基于方法二,就把gulp版本号改成”gulp”: “^4.0.0″,编辑gulpfile.js语法修改成gulp4
https://blog.csdn.net/weixin_40095485/article/details/115166642
公众号,小程序里面使用H5页面基本都会有分享H5的功能,这时候使用JS-SDK签名
https://developers.weixin.qq.com/doc/offiaccount/OA_Web_Apps/JS-SDK.html
html:
axios.get('https://gzh.jskoa.com/getjsapi_ticket?url='+window.location.href).then((res)=>{ //**注意这里的url不能带有#的hash,具体看文档
wx.config({
debug: false, // 开启调试模式,调用的所有api的返回值会在客户端alert出来,若要查看传入的参数,可以在pc端打开,参数信息会通过log打出,仅在pc端时才会打印。
appId: 'wx1d062c6797dd4774', // 必填,公众号的唯一标识
timestamp: res.data.timestamp, // 必填,生成签名的时间戳
nonceStr: res.data.noncestr, // 必填,生成签名的随机串
signature: res.data.signature, // 必填,签名
jsApiList: [
'checkJsApi',
'onMenuShareTimeline',
'onMenuShareAppMessage',
'updateTimelineShareData',
'updateAppMessageShareData',
'onMenuShareQQ',
'onMenuShareWeibo',
'hideMenuItems',
'chooseImage',
'updateAppMessageShareData',
'scanQRCode'
] // 必填,需要使用的JS接口列表
});
//分享功能
wx.ready(function () { //需在用户可能点击分享按钮前就先调用
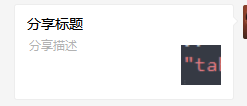
var shareData = {
title: '分享标题', // 分享标题
desc: '分享描述', // 分享描述
link: 'https://gzh.jskoa.com', // 分享链接,该链接域名或路径必须与当前页面对应的公众号JS安全域名一致
imgUrl: 'https://gzh.jskoa.com/images/1.png', // 分享图标
success: function (res) {
// 设置成功
},
error:function(res){
}
};
//自定义“分享给朋友”及“分享到QQ”按钮的分享内容(1.4.0)
wx.updateAppMessageShareData(shareData);
//自定义“分享到朋友圈”及“分享到QQ空间”按钮的分享内容(1.4.0)
wx.updateTimelineShareData(shareData);
});
// wx.error(function(res){
// alert(JSON.stringify(res))
// console.log(JSON.stringify(res))
// })
})
node.js后台
//signature签名算法
*需要把access_token和ticket存在服务器上,它们2个小时后才过期,不能每次请求一次页面都要重新获取,有次数限制的
var sign = require('./sign.js');

router.get('/getjsapi_ticket', async (ctx, next) => {


    let tokenInfo = fs.existsSync('token_info.json')
        ? JSON.parse(fs.readFileSync('token_info.json', 'utf-8'))
        : null
    let expires_time = tokenInfo ? tokenInfo.expires_time : ''
    let cache_access_token =
        tokenInfo && tokenInfo.access_token ? tokenInfo.access_token : ''

    let cache_ticketjson = fs.existsSync('ticket.json')
        ? JSON.parse(fs.readFileSync('ticket.json', 'utf-8'))
        : null

    if (
        parseInt(Date.now() / 1000) > expires_time + 3600 ||  //设置1个小时就更新
        tokenInfo == null ||
        cache_access_token == ''
    ) {


      //拿token
      var gettoken =  await new Promise(function (resolve, reject) {


                axios.get(`https://api.weixin.qq.com/cgi-bin/token?grant_type=client_credential&appid=${appid}&secret=${appsecret}` ).then(function (response2) {

                    fs.writeFileSync(
                        'token_info.json',
                        JSON.stringify({
                            access_token: response2.data.access_token,
                            expires_time: parseInt(Date.now() / 1000),
                        })
                    )

                    resolve(response2.data.access_token)
                })
                    .catch(function (error) {
                        console.log(error);
                    });

        });


        //拿ticket
       var ticketjson = await new Promise((a,b)=>{

            axios.get(`https://api.weixin.qq.com/cgi-bin/ticket/getticket?access_token=${gettoken}&type=jsapi` ).then(function (response2) {
                // {
                //     errcode: 0,
                //     errmsg: 'ok',
                //     ticket: 'O3SMpm8bG7kJnF36aXbe8_JQGXJ4DukP3a02ntc7x9lrWoqujnAjetfpaZzA1XGF6G9SVgw8M-W1Cpn7sfA0ZA',
                //     expires_in: 7200
                // }

                fs.writeFileSync(
                    'ticket.json',
                    JSON.stringify(sign(response2.data.ticket, ctx.request.query.url))
                )
                a(sign(response2.data.ticket, ctx.request.query.url)) //ticket换取signature签名


            })
                .catch(function (error) {
                    console.log(error);
                });
        })


        await new Promise((a,b)=>{
            ctx.body = ticketjson //wx.config配置返回给前端
            a(1)
        })
    } else {
        ctx.body =  sign(cache_ticketjson.jsapi_ticket, ctx.request.query.url) //有缓存就拿缓存数据 wx.config配置返回给前端
    }

})
展示一个分享案例:
一定要在微信上操作,或者开发者工具
Vue v2.4新增$attrs $listeners
直接上案例:
html:
<div id="app">
    <child1
            :p-child1="child1"
            :p-child2="child2"
            :p-child-attrs="1231"
            v-on:test1="onTest1"
            v-on:test2="onTest2">
    </child1>
</div>
js:
Vue.component("Child1", {
    inheritAttrs: true,
    props: ["pChild1"],
    template: `
    <div class="child-1">
    <p>in child1:</p>
    <p>props: {{pChild1}}</p>
    <p>$attrs: {{this.$attrs}}</p> //除了class、style和props,这里都能获取到父组件传来的值{ "p-child2": "pChild2的值", "p-child-attrs": 1231 }
    <hr>
    <child2 v-bind="$attrs" v-on="$listeners"></child2></div>`,
    mounted: function() {
        this.$emit("test1");
    }
});

Vue.component("Child2", {
    inheritAttrs: true,
    props: ["pChild2"],
    template: `
    <div class="child-2">
    <p>in child->child2:</p>
    <p>props: {{pChild2}}</p>
    <p>$attrs: {{this.$attrs}}</p>
      <button @click="$emit('test2','按钮点击')">触发事件</button>
    <hr> </div>`,
    mounted: function() {
        this.$emit("test2");
    }
});

const app = new Vue({
    el: "#app",
    data: {
        child1: "pChild1的值",
        child2: "pChild2的值"
    },
    methods: {
        onTest1() {
            console.log("test1 running...");
        },
        onTest2(value) {
            console.log("test2 running..." + value);
        }
    }
});
https://www.jianshu.com/p/a388d38f8c69