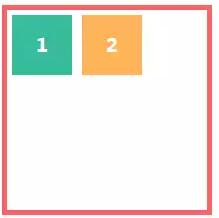
要了解什么主轴、交叉轴不然后面知识很难理解。上图是主轴和交叉轴的默认方向情况,一般都不会去改变。主轴不一定是水平方向,也可以是垂直方向。主轴决定着交叉轴的方向。所以主轴方向决定着flex布局。flex-direction属性决定着主轴方向。
Flex有老的属性和值,这里推荐使用新的属性和值
新版语法
定义容器的display属性
.box {
display : -webkit-flex ; /*webkit*/
display : flex ;
}
/*行内flex*/
.box {
display : -webkit-inline-flex ; /*webkit*/
display : inline-flex ;
}
*flex容器里面的所有子元素都会变成、内联元素、高度自适应。仅仅是作用子元素,子元素里面的元素不受影响。
容器样式
.box {
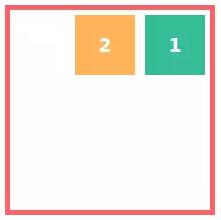
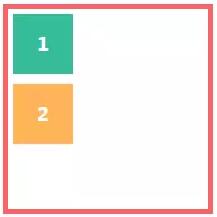
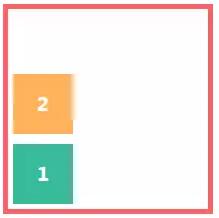
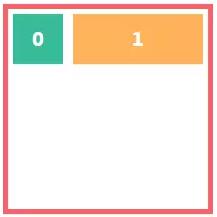
flex-direction : row | row-reverse | column | column-reverse ; 水平左对齐 | 水平右对齐且倒序 | 垂直(主轴顺时针旋转90度) | 垂直且倒序
/*主轴方向:左到右(默认) | 右到左 | 上到下 | 下到上*/
flex-wrap : nowrap | wrap | wrap-reverse ; 子元素超出容器的宽度时 不换行 | 换行,但换行的内容垂直方法左对齐 | 子元素在容器底部 ,换行内容在原来内容底部切垂直方法左对齐,(使用wrap时,容器最好是height:100%,不然换行会有间隙)
/*换行:不换行(默认) | 换行 | 换行并第一行在下方*/
flex-flow : <flex-direction> || <flex-wrap> ; 以上两个属性可以用这个属性合并。
/*主轴方向和换行简写*/
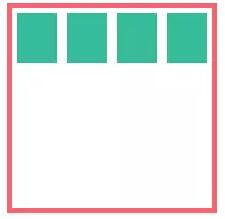
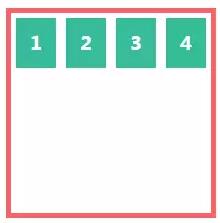
justify-content : flex-start | flex-end | center | space-between | space-around ; 水平方向: 左对齐 | 右对齐 | 居中| 容器两边会顶着子元素且平均间隔 | 子元素之间平均间隔
/*主轴对齐方式:左对齐(默认) | 右对齐 | 居中对齐 | 两端对齐 | 平均分布*/
align-items : flex-start | flex-end | center | baseline | stretch ; 垂直方向(交叉轴): 垂直顶部 | 垂直底部 | 垂直中
/*交叉轴对齐方式:顶部对齐(默认) | 底部对齐 | 居中对齐 | 上下对齐并铺满 | 文本基线对齐*/
align-content : flex-start | flex-end | center | space-between | space-around | stretch ; 注意:当只有一行 flex 项时,此属性不起作用。
/*多主轴对齐:顶部对齐(默认) | 底部对齐 | 居中对齐 | 上下对齐并铺满 | 上下平均分布*/
}
子元素属性
.item {
order : <integer> ;
/*排序:数值越小,越排前,默认为0*/ 控制子元素的排列位置
flex-grow : <number> ; /* default 0 */
/*放大:默认0(即如果有剩余空间也不放大,值为1则放大,2是1的双倍大小,以此类推)*/ 元素的占位百分比
flex-shrink : <number> ; /* default 1 */ 不推荐修改
/*缩小:默认1(如果空间不足则会缩小,值为0不缩小)*/
flex-basis : <length> | auto ; /* default auto */ 不推荐修改
/*固定大小:默认为0,可以设置px值,也可以设置百分比大小*/
flex : none | [ <‘flex-grow’> <‘flex-shrink’> ? || <‘flex-basis’> ]
/*flex-grow, flex-shrink 和 flex-basis的简写,默认值为0 1 auto,*/
align-self : auto | flex-start | flex-end | center | baseline | stretch ;
/*单独对齐方式:自动(默认) | 顶部对齐 | 底部对齐 | 居中对齐 | 上下对齐并铺满 | 文本基线对齐*/ 单独的子元素对齐
}
兼容写法: 定义容器的 display 属性:
.box {
display : -webkit-box ; /* 老版本语法: Safari, iOS, Android browser, older WebKit browsers. */
display : -moz-box ; /* 老版本语法: Firefox (buggy) */
display : -ms-flexbox ; /* 混合版本语法: IE 10 */
display : -webkit-flex ; /* 新版本语法: Chrome 21+ */
display : flex ; /* 新版本语法: Opera 12.1, Firefox 22+ */
}
子元素主轴对齐方式(水平方向)
.box {
-webkit-box-pack : center ;
-moz-justify-content : center ;
-webkit-justify-content : center ;
justify-content : center ;
}
子元素交叉轴对齐方式(垂直)
.box {
-webkit-box-align : center ;
-moz-align-items : center ;
-webkit-align-items : center ;
align-items : center ;
}
子元素的显示方向
.box {
-webkit-box-direction : normal ;
-webkit-box-orient : horizontal ;
-moz-flex-direction : row ;
-webkit-flex-direction : row ;
flex-direction : row ;
}
右到左
.box {
-webkit-box-pack : end ;
-webkit-box-direction : reverse ;
-webkit-box-orient : horizontal ;
-moz-flex-direction : row-reverse ;
-webkit-flex-direction : row-reverse ;
flex-direction : row-reverse ;
}
上到下
.box {
-webkit-box-direction : normal ;
-webkit-box-orient : vertical ;
-moz-flex-direction : column ;
-webkit-flex-direction : column ;
flex-direction : column ;
}
下到上
.box {
-webkit-box-pack : end ;
-webkit-box-direction : reverse ;
-webkit-box-orient : vertical ;
-moz-flex-direction : column-reverse ;
-webkit-flex-direction : column-reverse ;
flex-direction : column-reverse ;
}
是否允许子元素伸缩
.item {
-webkit-box-flex : 1.0 ;
-moz-flex-grow : 1 ;
-webkit-flex-grow : 1 ;
flex-grow : 1 ;
}
.item {
-webkit-box-flex : 1.0 ;
-moz-flex-shrink : 1 ;
-webkit-flex-shrink : 1 ;
flex-shrink : 1 ;
}
子元素的显示次序
.item {
-webkit-box-ordinal-group : 1 ;
-moz-order : 1 ;
-webkit-order : 1 ;
order : 1 ;
}
www.css88.com/archives/8629
微信地址
https://segmentfault.com/a/1190000003978624
推荐:http://www.ruanyifeng.com/blog/2015/07/flex-grammar.html