koa笔记 koa2 笔记
之前一直使用express觉得还可以,不久express团队又出了一个koa,也出现了1,2版本,目前学习最好使用koa2,使用了es6语法。直接上干货,使用过express上手搭建一个项目其实很简单。
首先:
npm install koa-generator -g //全局安装这个就可以使用koa命令了
在你需要创建koa项目的目录下输入以下命令
koa2 -e koa2   //此时就会出现一个koa2的目录,并且里面会有一些初始化的文件
如果想使用koa1的话就
koa -e 目录名称 //生成的是koa1的版本
koa2 -e 目录名称 //生成的时koa2的版本
进入到koa2目录下,接着安装需要的依赖模块
npm install
启动koa
node ./bin/www
最后打开浏览器输入:http://localhost:3000/ ,就可以看到我们网站建立了。
提示:如果简单使用node命令启动koa 2报错可以尝试使用
node --harmony xx.js
来启动我们的koa项目,因为koa有时候会需要es5的一些属性,带有–harmony参数才能够启用部分es5的功能。
要么升级node.js环境到7.6 以上
————————————–
————————————–
简单的启动web服务 ,访问http://localhost:3000/
var Koa =require('koa');
var app=new Koa();

app.use(async function (ctx,next) {
  await next();
  ctx.response.type='text/html';
  ctx.response.body='<div style="background: red">你好</div>';
});

app.listen(3000);
// koa2中间件执行顺序 (洋葱模式)
var Koa =require('koa');
var app=new Koa();


app.use(async function (ctx,next) {
  console.log(1); //<--最先被执行
  await next();
  console.log(2); //<--最后被执行
});


app.use(async function (ctx,next) {
  console.log(3);
  console.log(4);
  await next();
});


app.use(async function (ctx,next) {
  await next();
  console.log(5);
  console.log(6);
});


app.use(async function (ctx,next) {
  console.log(7);
  await next();
  console.log(8);
});


app.listen(3000);

// 结果
// 1
// 3
// 4
// 7
// 8
// 5
// 6
// 2
//封装一个中间件
//test.js中间件
function log( ctx ) {
  console.log( '执行自定义中间件' )
}

module.exports = function () {
  return async function ( ctx, next ) {
    log(ctx);
   await next()
  }
}
//加载,并调用
var test=require('./test');

app.use(test());
*koa@2中间件只支持 async/await 封装的,如果要使用koa@1基于generator中间件,需要通过中间件koa-convert封装一下才能使用
中间件之间传递数据
app.use(async function (ctx,next) {
  ctx.haha='haha';
  await next();
});


app.use(async function (ctx,next) {
  await next();
  console.log(ctx.haha); //我能获取到上一个中间件赋值的变量
});
ctx上下文
支持Es6的import导入
package.json 的根节点新增 “type”: “module” //注意要 v14.15.1以上, 不推荐这种写法,这样就不支持commonjs语法了
或者把要导入的模块改成后缀为mjs , import a from ‘./a.mjs’;
从 Node.js v13.2 版本开始
Node.js 要求 ES6 模块采用.mjs后缀文件名。也就是说,只要脚本文件里面使用import或者export命令,那么就必须采用.mjs后缀名。Node.js 遇到.mjs文件,就认为它是 ES6 模块,默认启用严格模式,不必在每个模块文件顶部指定”use strict”。
//区分测试环境、生产环境
cross-env NODE_ENV=production PORT=3001 node ./1.js
另一种方法:
"dev": "./node_modules/.bin/nodemon bin/www token=true",


//获取 bin/www xxx1=xxx2  后面的参数 打印出 { xxx1:xxx2 }
function getOption() {
    const arr = process.argv.slice(2); // 获取命令行参数数组
    const r = arr.reduce((pre, item) => { // 使用reduce方法对参数数组进行处理
        if (item.indexOf("=") !== -1) { // 判断参数是否有等号
            return [...pre, item.split("=")]; // 将带有等号的参数进行分割并添加到结果数组中
        }
        return pre; // 否则返回原结果数组
    }, []);
    const params = Object.fromEntries(r); // 将结果数组转化为参数对象
    return params; // 返回参数对象
}

调用:getOption().token  //获取都token的字段值
// 数据跟踪监听
var Koa =require('koa');
var app=new Koa();

const logger = require('koa-logger');

app.use(logger());

app.use(async function (ctx,next) {
 await next();
 ctx.response.type='text/html';
 ctx.response.body='<div style="background: red">你好</div>';
});

app.listen(3000);
创建一个页面
创建首页http://127.0.0.1/
 router.get('/', function (ctx, next) { //首页
     ctx.body = 'Hello World!';
 })
推荐此方法创建页面:
 router.get('www/:id/:age', async function (ctx, next) {
   ctx.state = {
      title:'ffff'+ctx.params.id
   };
   await ctx.render('index', {
   });
 })
get传参
//page1页面传参
router.get('page1/:id/:age', async function (ctx, next) {
   ctx.state = {
      title:'ffff'+ctx.params.id
   };
   await ctx.render('index', {
   });
})

地址:http://xxxx.com/page1/参数1/参数2
//首页传参
router.get(':id/:age', async function (ctx, next) {
   ctx.state = {
      title:'ffff'+ctx.params.id
   };
   await ctx.render('index', {
   });
})

地址:http://xxxx.com/参数1/参数2
连缀
 router //这里是4个路由
 .get('/', function (ctx, next) {
    ctx.body = 'Hello World!';
 })
 .post('/users', function (ctx, next) {
    // ...
 })
 .put('/users/:id', function (ctx, next) {
    // ...
 })
 .del('/users/:id', function (ctx, next) {
    // ...
 });
路由回调
为某个路由访问成功添加回调
router.get('/',async (ctx, next) => {
  console.log('1');
  await next(); //要加这个才能执行到all回调
  console.log('2');
}).all('/',async function (ctx, next) {
  console.log('3');
});

结果:
1
3
2
跟中间件的洋葱模式一样
路由全局 (很有用) 拦截器
效果就是访问任意一个url路由之前时,都要执行某段业务逻辑。
不管先访问首页还是haha,都要先执行all路由。
router.all('*',async function (ctx, next) {
  ctx.state={  //全局变量,在ejs模板中可以直接显示出,如<%= web %>
      web:'http://localhost:3000',
      title:'111'
  }
  await next(); //必须加这个
});

router.get('/',async (ctx, next) => {
  //ctx.state,可以获取到初始变量
  ctx.type='json';
  ctx.body={xx:'123'};
});

router.get('haha',async (ctx, next) => {
  ctx.body='haha';
});
或者
router.use(async (ctx,next)=>{

    //全局的G变量
    ctx.state.G={
        url:'http://www.itying.com',
        userinfo:111,
        prevPage:222   /*上一页的地址*/
    }
    await next();
})

router.use('/',index.routes());
router.use('/admin',admin.routes());
前缀
 const router = new Router({
    prefix: '/users'
 });

 router.get('/', ...); //实际的响应路径是:/users
 router.get('/:id', ...); //实际的响应路径是:/users/:id
为一个路由命名
router.get('home',':haha/:vv', function (ctx, next) { //为首页的路由命名为home
 ctx.body = 'Hello World!';
 router.url('home', 3,'age') //第一次参数填写路由名称,第二个参数开始填写自定义参数,输出:/3/age
})
路由使用中间件
 router.use(session(), authorize()); //所有路由都使用这两个中间件
 router.use('/users', userAuth()); //只有跳转到/users页面时使用 这个中间件
 router.use(['/users', '/admin'], userAuth()); //只有这两个页面可以使用
 app.use(router.routes()); //上面是设置,此步骤是启动
单个路由支持多个中间件执行
//child.js

function log( ctx ) {
  console.log( '执行自定义中间件' )
}

module.exports = function () {
  return async function ( ctx, next ) {
    log(ctx);
    await next()
  }
};
var child=require('./child');

router.get('/',
  child(), //一个中间件
  async (ctx,next)=>{ //一个中间件
     console.log(11111);
     await next();
  },
  async (ctx, next) => {
     await ctx.render('index',{
       title:'xxxxx'
     })
});
重定向、页面跳转
ctx.redirect('http://localhost:3000/www/123/456')
app.use(async function (ctx,next) {   //访问到首页就自动跳转到/wucg目录。像apache、nginx也能实现
  if(ctx.originalUrl=='/'){
    ctx.response.redirect('/wucg');
  }
  await next();
});

router.use('/wucg',index.routes(),index2.routes());
router.use('/admin',admin.routes());

app.use(router.routes(), router.allowedMethods());
//让页面报错 抛错
//全局,在一个路由上设置,会让所有接口都报400
ctx.throw([msg],[status],[properties])
ctx.throw(400, 'name required');

//局部,单个接口报错
router.post('/hnsy-app/aed/pageAedInfo',async (ctx, next)=>{
    await new Promise((a,b)=>{

        setTimeout(()=>{
            ctx.status=500
            a()
        },8000)

    })

})
SSL、https
node.js配置ssl、http2
路由参数验证
要访问该地址之前http://127.0.0.1/www/参数1/参数2,先验证参数1,2,在决定是否在跳转
router
 .param('ff', function (ff, ctx, next) {  //参数1的验证逻辑
      console.log(ff+'<----------------');
      return next();
 })
 .param('vv', function (vv, ctx, next) {  //参数2的验证逻辑
      console.log(vv+'<----------------');
      if (!vv) return ctx.status = 404;
      return next();
 })
 .get('www/:ff/:vv', async function (ctx, next) {
   // ctx.state = {
     // title:'shouye1111'
   // };

     await ctx.render('index', {
       title:'shouye1111'+ctx.params.ff
     });
})
一个路由业务逻辑分离成多个路由
假如我们在写后台的业务逻辑时,往往需要很多判断,我们不可能把所有代码都写进一个路由中,时间长了代码不容易维护,这时候我们需要把后台的业务逻辑同时分离归类成多个文件,编辑文件app.js
const admin = require('./routes/admin/admin_login'); //后台登陆页面
const admin_default = require('./routes/admin/admin_default'); //后台登陆页面后的业务逻辑
.
.
.
router.use('/admin', admin.routes(), admin.allowedMethods());
router.use('/admin', admin_default.routes(), admin_default.allowedMethods());
或者
const admin = require('./routes/admin/admin_login');
router.use(admin.routes(), admin.allowedMethods());
编辑:./routes/admin/admin_login.js,
const router = require('koa-router')()
router.prefix('/admin')  //新增
————以上是路由的使用——————–post和get
后台获取客户端get发来的数据123
ctx.query //{wo:’chen’,age:’123′} ,获取到的是url这样传递的数据,http://xxx/1.php?wo=’chen’&age=’123′
后台获取客户端post发来的数据
cookies的设置和获取
例如:
ctx.cookies.set(
 'state',
 'hello world',
 {
   domain: 'localhost', // 写cookie所在的域名
   path: '/', // 写cookie所在的路径
   maxAge:7200000, // 2小时有效
   expires: new Date('2017-07-15'), // cookie失效时间
   httpOnly: false, // 是否只用于http请求中获取
   overwrite: false // 是否允许重写
 }
)

ctx.cookies.set('token', response2.data.access_token,{maxAge:7200000}) //2小时有效
ctx.cookies.get(name, [options]) //获取
session使用
方法一:
npm install koa-session --save  //安装

//编辑main.js,加入以下内容
const session = require('koa-session');

app.keys = ['some secret hurr'];
const CONFIG = {
 key: 'koa:sess', //cookie key (default is koa:sess)
 maxAge: 86400000, // cookie的过期时间 maxAge in ms (default is 1 days)
 overwrite: true, //是否可以overwrite (默认default true)
 httpOnly: true, //cookie是否只有服务器端可以访问 httpOnly or not (default true)
 signed: true, //签名默认true
 rolling: false, //在每次请求时强行设置cookie,这将重置cookie过期时间(默认:false)
 renew: false, //(boolean) renew session when session is nearly expired,
};
app.use(session(CONFIG, app));
方法二:
npm install koa2-cookie-session --save
import session from "koa2-cookie-session"; //一定要用这种方式加载
var router = require('koa-router')();
router.use(session({
  key: "SESSIONID", //default "koa:sid"
  expires:3, //default 7
  path:"/" //default "/"
}));

router.get('home',':haha/:vv',async function (ctx, next) {
  ctx.session.user = {name: "myname更新"}; //设置
});

ctx.session.user //获取
api 接口
router.get('/json', async (ctx, next) => {

 ctx.body = {
   code:200,
   title: 'koa2 json',
   data:{
    xx:1,
    xx:2
   }
 }

})
生成log日志文件
下载:log
1,安装:npm install –save log4js //4.5.1
// logger
const logsUtil = require('./utils/logs.js');
app.use(async (ctx, next) => {
    const start = new Date();              // 响应开始时间
    let intervals;                      // 响应间隔时间
    try {
        await next();
        intervals = new Date() - start;
        logsUtil.logResponse(ctx, intervals);  //记录响应日志
    } catch (error) {
        intervals = new Date() - start;
        logsUtil.logError(ctx, error, intervals);//记录异常日志
    }
})


router.use('/',index.routes(),index2.routes());
router.use('/admin',admin.routes());
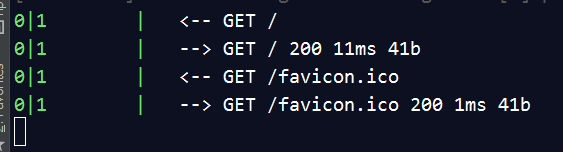
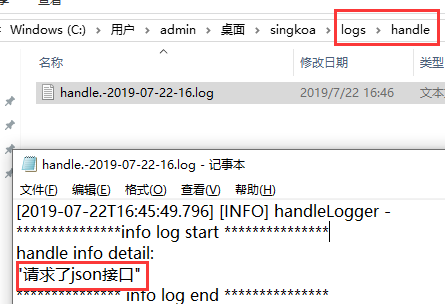
启动项目后,访问下网站就会在根目录下生成logs目录,里面就记录这log日志文件了
记录指定路由日志
const logsHandle = require("../utils/logs.js").logHandle;
const logsInfo = require("../utils/logs.js").logInfo;
.
.

router.get('json', async (ctx, next) => {
    logsHandle("请求了json接口")  // 假设此处需要记录敏感操作的日志
    logsInfo("请求了json接口")    // 假设此处需要在控制台打印日志
    ctx.body = {
        title: 'koa2 json'
    }
})
日志打印出
https://www.cnblogs.com/HoChine/p/10717831.html
自定义404页面
404页面也可以用nginx、apache来处理
//编辑以下代码
app.use(async (ctx, next) => {
 if (ctx.status === 404){
    ctx.state={
       title:'404页面'
    };
    await ctx.render('error', {  //error为你的错误页面
    });
 }
});


module.exports = app;
接着在views/error.ejs,创建错误页面,即可。
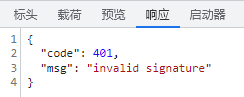
自定义接口错误信息 ,编辑app.js
// 身份认证错误中间件
app.use(async (ctx, next) => {
    return next().catch(err => {
        if (err.status === 401) {
            // 自定义返回结果
            ctx.status = 401;
            console.log(err.name);
            ctx.body = {
                code: 401,
                msg: err.message
            };
        } else {
            throw err;
        }
    });
});
效果:
时间戳
这里推荐使用一款模块插件
安装:
npm install moment加载调用:
var moment = require('moment' );
moment().format();案例:
moment().format('YYYY-M-DD kk:mm:ss'); //2017-01-01 01:01:01文档:http://momentjs.com/docs/#/displaying/
上传
安装:
npm install koa-body@2 --save前端:创建页面views/upload.ejs
<!doctype html>
<html>
<body>
<form action="/upload " enctype="multipart/form-data" method="post">
<input type="text" name="username" placeholder="username"><br>
<input type="text" name="title" placeholder="title of file"><br>
<input type="file" name="uploads" multiple="multiple"><br>
<button type="submit">Upload</button>
</form>
</body>
</html>
后台:routes/index.js
router.get('/haha',async function (ctx,next) {
   await ctx.render('upload', {});
});


router.post('upload',
    koaBody({
        multipart: true,
        formidable: {
            uploadDir:process.cwd() + '/public/upload',
            keepExtensions:true,
            onFileBegin: (name, file) => { // 文件上传前的设置
                const fp = process.cwd() + '/public/upload';
                if (!fs.existsSync(fp)) { // 检查是否有“public/upload/”文件夹
                    fs.mkdirSync(fp); // 没有就创建
                }
            }
        }
    }),
    async function (ctx,next) {
        await new Promise((a,b)=>{

            if((ctx.request.body.files["file"]).size==0){
                fs.unlink((ctx.request.body.files["file"]).path,function (err) {
                    if(err) throw err;
                    console.log('成功')
                });

            }
            a();
        });
        ctx.body =ctx.request.body;
    }

)
要注意提交action的路径和图片上传到服务器的路径
访问http://localhost:3000/haha
koa-body参数:
参数名
描述
类型
默认值
patchNode
将补丁写入ctx.req节点中
Boolean
false
patchKoa
将补丁写入ctx.request节点中
Boolean
true
jsonLimit
JSON 数据体的大小限制
String / Integer
1mb
formLimit
限制表单请求体的大小
String / Integer
56kb
textLimit
限制 text body 的大小
String / Integer
56kb
encoding
表单的默认编码
String
utf-8
multipart
是否支持 multipart-formdate 的表单
Boolean
false
urlencoded
是否支持 urlencoded 的表单
Boolean
true
text
是否解析 text/plain 的表单
Boolean
true
json
是否解析 json 请求体
Boolean
true
jsonStrict
是否使用 json 严格模式,true 会只处理数组和对象
Boolean
true
formidable
配置更多的关于 multipart 的选项
Object
onError
错误处理
Function
stict
严格模式,启用后不会解析 GET, HEAD, DELETE 请求
Boolean
true
其中formidable
参数名
描述
类型
默认值
maxFields
限制字段的数量
Integer
1000
maxFieldsSize
限制字段的最大值
Integer
2mb (2 * 1024 * 1024)
uploadDir
设置文件上传的文件夹
String
os.tmpDir()
keepExtensions
保留原来的文件后缀
Boolean
false
hash
如果希望计算传入文件的校验,请将其设置为“sha1”或“md5”
String
false
multipart
是否支持多文件上传
Boolean
true
onFileBegin
开始时对文件进行特殊回调。它可以用于在将文件保存到磁盘之前重命名文件等
Function
案例:
推荐把bodyparse加载到app.js里面的全局中,不然每个router都要加载才能获取post传来的数据不现实
app.use(koaBody({
    multipart: true,
    formidable: {
        uploadDir:process.cwd() + '/public/upload',
        keepExtensions:true,
        onFileBegin: (name, file) => { // 文件上传前的设置
            const fp = process.cwd() + '/public/upload';
            if (!fs.existsSync(fp)) { // 检查是否有“public/upload/”文件夹
                fs.mkdirSync(fp); // 没有就创建
            }
            // console.log(`bodyparse: name:${name}; file:${util.inspect(file)}`);
        }
    }
}));
https://blog.csdn.net/weixin_40415614/article/details/84783723
上传base64图片
base64的形式为“data:image/png;base64,iVBORw0KGgoAAAANSUhEUgAAABQAAAAUCAYAAACNiR0。。。。”;
前端:
<form action="/uploadbase64" enctype="multipart/form-data" method="post">
  <input value="" name="baseimg" hidden id="baseimg">
  <input id="fielinput" type="file" multiple="multiple" accept="image/*" onchange="showPreview(this)"><br>
  <img id="fielImg" src="" />
  <button>Upload</button>
</form>
<script>
    function showPreview(source) {
        var file = source.files[0];
        //判断文件类型
        var extfile = file.name;
        var AllImgExt=".jpg|.jpeg|.gif|.bmp|.png|";
        var extName = extfile.substring(extfile.lastIndexOf(".")).toLowerCase();//(把路径中的所有字母全部转换为小写)
        if(AllImgExt.indexOf(extName+"|")==-1)
        {
            var ErrMsg="该文件类型不允许上传。请上传 "+AllImgExt+" 类型的文件,当前文件类型为"+extName;
            alert(ErrMsg);
            return false;
        }
        if(window.FileReader) {
            var fr = new FileReader();
            fr.readAsDataURL(file);
            fr.onloadend = function(e) {
                document.getElementById("fielImg").src = e.target.result;
                document.getElementById("baseimg").value = e.target.result;
            };
        }else{
            alert('浏览器不支持预览图片');
        }
    };

</script>
后台:
router.post('uploadbase64',async (ctx, next) => {

    var imgData=ctx.request.body.fields.baseimg;
    var reg=/^data:image\/(\w+);base64,/;  //传给后台的base64,前面这部分的不要,前端显示才需要
    var base64Data = imgData.replace(reg, "");
    var imgtype=RegExp.lastParen; //获取到括号的字符串


   // var dataBuffer = new Buffer(base64Data, 'base64');  //也可以用,但是会提示有安全问题
    var dataBuffer =Buffer.from(base64Data, 'base64');
    fs.writeFile(process.cwd() + '/public/upload/image.'+imgtype, dataBuffer, function(err) {
        // if(err){
        //     res.send(err);
        // }else{
        //     res.send("保存成功!");
        // }
    });


    ctx.body =ctx.request.body;
});
下载
另存为效果
接口模拟延迟
router.post('/syldmh-web/service/wdzhq/getTopicData',async (ctx,next) =>{

 async function delay(time) {
  return new Promise(function(resolve, reject) {
     setTimeout(function(){
        resolve();
     }, time);
  });
 };
 await delay(4000);

 ctx.body = {}

})
图片压缩
使用第三方:https://tinypng.com/developers/reference/nodejs
安装:npm install –save tinify
在 app.js
const tinify = require("tinify");
tinify.key = "API Key";
上传接口:
const tinify = require("tinify");
.
.
router.post('upload',koaBody({
   multipart: true,
   formidable: {
     uploadDir:process.cwd() + '/public/upload',
     keepExtensions:true,
     onFileBegin: (name, file) => { // 文件上传前的设置
       const fp = process.cwd() + '/public/upload';
       if (!fs.existsSync(fp)) { // 检查是否有“public/upload/”文件夹
         fs.mkdirSync(fp); // 没有就创建
       }
     }
   }
}),async (ctx, next) => {

  if( !!ctx.request.body.files["file"].length ){ //多图片
    for(let i=0;i<ctx.request.body.files["file"].length;i++){
      fs.readFile(ctx.request.body.files['file'][i].path, function(err, sourceData) {
        if (err) throw err;
        tinify.fromBuffer(sourceData).toBuffer(function(err, resultData) {
          if (err) throw err;
          console.log(resultData);
          fs.writeFile(ctx.request.body.files['file'][i].path, resultData, function(err) { //压缩后覆盖原图
             console.log('覆盖成功');
          });
        });
      });
     }
  }else{ //单图片
     fs.readFile(ctx.request.body.files['file'].path, function(err, sourceData) {
       if (err) throw err;
       tinify.fromBuffer(sourceData).toBuffer(function(err, resultData) {
          if (err) throw err;
          console.log(resultData);
          fs.writeFile(ctx.request.body.files['file'].path, resultData, function(err) { //压缩后覆盖原图
             console.log('覆盖成功');
          });
       });
      });
    }

   ctx.body =ctx.request.body;
});
启动服务器仅执行一次
console.log('只会执行一次');

app.use(async function (ctx,next) {
  await next();
});
只要不把代码写在中间件里面,只有koa启动时执行一次
文本编辑器wangeditor2
http://www.kancloud.cn/wangfupeng/wangeditor2/113964
https://github.com/wangfupeng1988/wangEditor
加载必要插件:
https://github.com/wangfupeng1988/wangEditor/tree/master/test/plupload/lib/plupload
<link rel ="stylesheet" type ="text/css" href ="../dist/css/wangEditor.min.css" >
<div id="div1">
<p>请输入内容...</p>
</div>
<script type ="text/javascript" src ="../dist/js/lib/jquery-1.10.2.min.js" > </script >
<script type ="text/javascript" src ="lib/plupload/plupload.full.min.js" > </script >
<script type ="text/javascript" src ="../dist/js/wangEditor.min.js" > </script >
<script type ="text/javascript" >
function printLog(title, info) {
window.console && console.log(title, info);
}
// ------- 配置上传的初始化事件 -------
function uploadInit () {
// this 即 editor 对象
var editor = this;
// 编辑器中,触发选择图片的按钮的id
var btnId = editor.customUploadBtnId;
// 编辑器中,触发选择图片的按钮的父元素的id
var containerId = editor.customUploadContainerId;
//实例化一个上传对象
var uploader = new plupload.Uploader({
browse_button: btnId, // 选择文件的按钮的id
url: '/admin/upload', // 服务器端的上传地址
flash_swf_url: '/plupload/lib/plupload/Moxie.swf',
sliverlight_xap_url: '/plupload/lib/plupload/Moxie.xap',
filters: {
mime_types: [
//只允许上传图片文件 (注意,extensions中,逗号后面不要加空格)
{ title: "图片文件", extensions: "jpg,gif,png,bmp" }
]
}
});
//存储所有图片的url地址
var urls = [];
//初始化
uploader.init();
//绑定文件添加到队列的事件
uploader.bind('FilesAdded', function (uploader, files) {
//显示添加进来的文件名
$.each(files, function(key, value){
printLog('添加文件' + value.id);
});
// 文件添加之后,开始执行上传
uploader.start();
});
//单个文件上传之后
uploader.bind('FileUploaded', function (uploader, file, responseObject) {
//注意,要从服务器返回图片的url地址,否则上传的图片无法显示在编辑器中
var url = responseObject.response;
//先将url地址存储来,待所有图片都上传完了,再统一处理
urls.push(url);
printLog('一个图片上传完成,返回的url是' + url);
});
//全部文件上传时候
uploader.bind('UploadComplete', function (uploader, files) {
printLog('所有图片上传完成');
// 用 try catch 兼容IE低版本的异常情况
try {
//打印出所有图片的url地址
console.log(urls)
$.each(urls, function (key, value) {
printLog('即将插入图片' + value);
// 插入到编辑器中
//editor.command(null, 'insertHtml', '<img src="' + value + '" style="max-width:100%;"/>');
editor.$txt.append('<img src="' + value + '" style="max-width:100%;"/>');
});
} catch (ex) {
// 此处可不写代码
} finally {
//清空url数组
urls = [];
// 隐藏进度条
editor.hideUploadProgress();
}
});
// 上传进度条
uploader.bind('UploadProgress', function (uploader, file) {
// 显示进度条
editor.showUploadProgress(file.percent);
});
}
// ------- 创建编辑器 -------
var editor = new wangEditor('div1');
editor.config.customUpload = true; // 配置自定义上传的开关
editor.config.customUploadInit = uploadInit; // 配置上传事件,uploadInit方法已经在上面定义了
editor.create();
</script > admin/upload页面
//编辑器中的上传,支持单、多文件上传
router.post('/upload',
 koaBody({
 multipart: true,
 formidable: {
 uploadDir:path.join(process.cwd(), '/public/images')
 }
 }),
 async function (ctx,next) {

 //console.log(ctx.request.body.fields);
 // => {username: ""} - if empty
 //console.log( ((((ctx.request.body.files["file"])).name).split('.'))[(((((ctx.request.body.files["file"])).name).split('.')).length-1)] );
 //console.log( (((ctx.request.body.files)["uploads"])).path );
 // console.log( (((((ctx.request.body.files)["uploads"])).name).split('.'))[(((((ctx.request.body.files)["uploads"])).name).split('.')).length-1] );
 /* => {uploads: [
 {
 "size": 748831,
 "path": "/tmp/f7777b4269bf6e64518f96248537c0ab.png",
 "name": "some-image.png",
 "type": "image/png",
 "mtime": "2014-06-17T11:08:52.816Z"
 },
 {
 "size": 379749,
 "path": "/tmp/83b8cf0524529482d2f8b5d0852f49bf.jpeg",
 "name": "nodejs_rulz.jpeg",
 "type": "image/jpeg",
 "mtime": "2014-06-17T11:08:52.830Z"
 }
 ]}
 */
 // ctx.body = JSON.stringify(ctx.request.body, null, 2)

 await new Promise((a,b)=>{
    cox.body='http://www.xxx.com/1.jpg'
 })
 }
)
验证码
https://sdeno.com/?p=5425
加密
var crypto = require('crypto');  //node.js内置
module.exports = function(pwd) {
  var hash = crypto.createHash('sha256').update(pwd).digest('base64');
  return hash;
};
验证token
《node.js实现token身份验证 》
手机页面
使用pc端或者手机端访问可以智能判断切换页面,实现方法有2种:
1,在客户端顶部添加js来判断pc、手机端来实现域名跳转,来访问不同页面。好处就是让服务器减轻负担,坏处就是域名发生跳转。
2,在后台判断来实现加载pc、手机端模版,好处是域名始终不变。坏处就是,稍微给服务器添加一些负担。
npm install koa2-useragent --save
//编辑app.js
const Koa = require('koa');
.
.
.
import userAgent from 'koa2-useragent';
app.use(userAgent());
//路由
router.get('/', async function (ctx, next) {
    console.log(ctx.userAgent);
    .
    .
    .
    if(ctx.userAgent.isMobile){  //客户端不同,应用不同模板
         await ctx.render('mobile_index.ejs', {
         });
    }else{
         await ctx.render('home_index', {
         });
    }
})
https://www.npmjs.com/package/koa2-useragent
子进程
//父亲
var childProcess = require('child_process');
.
.
router.get('/',async (ctx, next) => {
  await new Promise((a,b)=>{
    childProcess.fork(process.cwd()+'/routes/child.js',[]).on('message', function(m) {
       console.log('儿子发来的信息: ', m); //此处是,老爸接受到儿子发来的信息
       a();
    }).send(ctx); //把ctx传给儿子
  });

  await ctx.render('index', Object.assign({
    title:'55'
  },pubObj));
});
//child.js 儿子 (子进程)
;(async function () {
  process.on('message', function(ctx) {
    ctx.xxx=123; // ctx 是老爸传来的数据,也可以自己添加额外数据传回去
    process.send({ Hello: '老爸我是儿子' }); //向老爸发送信息
    process.exit(0); //儿子发数据给老爸后,任务完成退出。
  });
})();
推荐看看 www.xgllseo.com/?p=5801
数据缓存
npm install node-cache --save
准备:
加载并实例化
const NodeCache = require( "node-cache" );
const myCache = new NodeCache(); //参数默认
const myCache = new NodeCache( { stdTTL: 0, checkperiod: 600 } );

//单值
myCache.set( "myKey", "aa");//设置
myCache.get( "myKey" ) //取值
myCache.has("myKey") //判断值是否存在true存在,false不存在
myCache.del( "myKey" ) //删除
value = myCache.take( "myKey" )  //赋值给value变量并删除"myKey"

//多值
myCache.mset([
    {key: "myKey", val: obj, ttl: 10000},
    {key: "myKey2", val: obj2},
])
myCache.mget( [ "myKeyA", "myKeyB" ] );
myCache.del( [ "B", "C" ] )

myCache.keys(); //获取当前所有变量名 [ "all", "my", "keys", "foo", "bar" ]

//回调
myCache.on( "set", function( key, value ){
    // ... do something ...
});

myCache.on( "del", function( key, value ){
    // 手动删除,或者值过期
});

myCache.on( "expired", function( key, value ){
    //值过期
});
https://www.npmjs.com/package/node-cache
代理
请求第三方接口,把数据渲染到前端
安装所需模块:
npm i request -S  //用来请求接口类似ajax
npm install --save-dev koa2-proxy-middleware  //设置代理
编辑app.js
const proxy = require('koa2-proxy-middleware'); //加载
const bodyparser = require('koa-bodyparser')
.
.
.
//参数设置
const options = {
  targets: {
    '/api/(.*)': {
      target: 'http://testh3.xxx.com/',
      changeOrigin: true,
      pathRewrite: {
        '^/api': ''
      }
    },
  }
}

app.use(proxy(options)); //注册到koa中


// bodyparser一定要放在代理后面不然会有问题
app.use(bodyparser({  //解析post数据
  enableTypes:['json', 'form', 'text']
}))
路由案例:
const router = require('koa-router')()
const request = require('request');

//注意/api/就相当于前缀,其实真是的接口没有,本地代理需要加上而已
request.post('http://localhost:3000/api/wucg/cms/provinceCity/list', function optionalCallback(err, httpResponse, body) {

    router.get('/', async (ctx, next) => {
        await ctx.render('index', {
            title: body
        })
    })

})
– – – – – – – – – – – – – – – – – – – – – – – – – – – – – – – – – – – – – – – – – –
首先安装
npm install koa@next //保证安装koa是2.x版本
– – – – – – – – – – – – – – – – – – – – – – – – – – – – – –
搭建http
//1.js
const Koa = require('koa');
const app = new Koa();

app.listen(3000);
执行node 1.js
打开http://localhost:3000/ ,会看到”Not Found”,那是因为没有像客户端发送任何数据。
– – – – – – – – – – – – – – – – – – – – – – – – – – – – – –
向客户端发送数据
const Koa = require('koa');
const app = new Koa();

app.use((ctx)=>{
    ctx.response.body = '你好';
});

app.listen(3000);
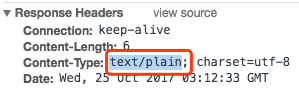
打开页面 http://localhost:3000/ ,可以看到显示内容“你好”,如果没有指定发送给客户端的数据类型默认是:text/plain
– – – – – – – – – – – – – – – – – – – – – – – – – – – – – –
指定发送客户端的数据类型
const Koa = require('koa');
const app = new Koa();

app.use((ctx)=>{
    ctx.response.type = 'html';
    ctx.response.body = '<html><head><title>你好</title></head><body><p>这里</p></body></html>';
});

app.listen(3000);
其他常见类型有:xml、json、text
– – – – – – – – – – – – – – – – – – – – – – – – – – – – – –
koa2原生路由
app.use((ctx)=>{
    if(ctx.request.path == '/'){  //首页
        ctx.response.type = 'html';
        ctx.response.body = '<html><head><title>你好</title></head><body><p>首页</p></body></html>';
    }
    if(ctx.request.path == '/about'){   // http://localhost:3000/about
        ctx.response.type = 'html';
        ctx.response.body = '<html><head><title>你好</title></head><body><p>关于我们</p></body></html>';
    }
});
– – – – – – – – – – – – – – – – – – – – – – – – – – – – – –
静态资源
//在二级目录public里面存放着css.css
const Koa = require('koa');
const app = new Koa();


app.use(require('koa-static')(__dirname + '/public'));
app.listen(3000);
html:
目录:public\js\jquery.min.js

<script src="/js/jquery.min.js"></script>  //引入
访问http://127.0.0.1:3000/css.css ,可以直接访问到内容
– – – – – – – – – – – – – – – – – – – – – – – – – – – – – –
为静态资源加版本号
<script src="<%- '/js/jquery.min.js?='+ver %>"></script>
var pubObj={ver:'22.2'};  //公共对象,推荐放在app.js中

router.get('/',async (ctx, next) => {
  await ctx.render('index', Object.assign({
     title:'首页'
  },pubObj));
});
推荐使用gulp、webpack类似工具添加版本号
– – – – – – – – – – – – – – – – – – – – – – – – – – – – – –
302自动跳转、重定向
const Koa = require('koa');
const app = new Koa();


app.use((ctx)=>{
    if(ctx.request.path == '/'){
        ctx.response.redirect('/about')  //访问首页时,会自动跳转到/about页面
        ctx.response.type = 'html';
        ctx.response.body = '<html><head><title>你好</title></head><body><p>首页</p></body></html>';
    }
    if(ctx.request.path == '/about'){
        ctx.response.type = 'html';
        ctx.response.body = '<html><head><title>你好</title></head><body><p>关于我们</p><form method="get" action="/ser"><input type="text" name="xxx1"><input type="submit" value="提交"></form></body></html>';
    }

});

app.listen(3000);
– – – – – – – – – – – – – – – – – – – – – – – – – – – – – –
中间件,在客户端中将数据传递给后台接收时,的中间过程都会经历一层层的中间处理后才能将数据传递到后台。
app.use() //就是专门加载中间件的,new require(‘koa’)().use
const Koa = require('koa');
const app = new Koa();

// 以下执行顺序是同步执行
const one = (ctx, next) => {
    console.log('>> one');
    next();
    console.log('<< one');
}

const two = (ctx, next) => {
    console.log('>> two');
    next();
    console.log('<< two');
}

const three = (ctx, next) => {
    console.log('>> three');
    next();
    console.log('<< three');
}

app.use(one);
app.use(two);
app.use(three);

app.listen(3000);
-----------------
结果:
>> one
>> two
>> three
<< three
<< two
<< one
const Koa = require('koa');
const app = new Koa();


const one = (ctx, next) => {
 console.log('>> one');
 next();
 console.log('<< one');
}

const two = (ctx, next) => {
 console.log('>> two');
                        //next()  删除
 console.log('<< two');
}

const three = (ctx, next) => {
 console.log('>> three');
 next();
 console.log('<< three');
}

app.use(one);
app.use(two);
app.use(three);

app.listen(3000);
-----------------
结果:
>> one
>> two
<< two
<< one
所以说,要保证所有的中间件能运行的到,就要使用next()进行串联
中间件,异步执行
const one =async (ctx, next) => {
   await console.log('>> one1');
    next();
    await console.log('<< one2');
}

const two =async (ctx, next) => {
    await console.log('>> two3');
    next();
    await console.log('<< two4');
}

const three =async (ctx, next) => {
    await console.log('>> three5');
    next();
    await console.log('<< three6');
}
执行结果完全打乱
– – – – – – – – – – – – – – – – – – – – – – – – – – – – – –
合并中间件,如果觉得app.use()使用的频率过高,可以使用koa-compose
npm install koa-compose
案例:
const middlewares = compose([one, two,three]);
app.use(middlewares);
– – – – – – – – – – – – – – – – – – – – – – – – – – – – – –
500 错误
const main = ctx => {
 ctx.throw(500);
};
404错误
const main = ctx => {
 ctx.response.status = 404;   //就相当于ctx.throw(404)
 ctx.response.body = 'Page Not Found';
};
– – – – – – – – – – – – – – – – – – – – – – – – – – – – – –
错误的统一处理
为了方便处理错误,最好使用try…catch将其捕获。但是,为每个中间件都写try…catch太麻烦,我们可以让最外层的中间件,负责所有中间件的错误处理。
const handler = async (ctx, next) => {
  try {
    await next();
  } catch (err) {  //报错执行此处
    ctx.response.status = err.statusCode || err.status || 500;
    ctx.response.body = {
      message: err.message
    };
  }
};

const main = ctx => {
  ctx.throw(500);
};

app.use(handler);
app.use(main);
类似效果,对错误后的处理
const main = ctx => {
 ctx.throw(500);
};

app.on('error', (err, ctx) =>
 console.error('server error', err);
);
注意:同时使用try…catch 和 app.on(‘error’,fn),监听error事件不会被触发,除非释放错误事件,例如:
const handler = async (ctx, next) => {
 try {
   await next();
 } catch (err) {
   ctx.response.status = err.statusCode || err.status || 500;
   ctx.response.type = 'html';
   ctx.response.body = '<p>Something wrong, please contact administrator.</p>';
   ctx.app.emit('error', err, ctx);  //释放错误app.on('error',fn)才能被执行
 }
};

const main = ctx => {
   ctx.throw(500);
};

app.on('error', function(err) {
   console.log('logging error ', err.message);
   console.log(err);
});
– – – – – – – – – – – – – – – – – – – – – – – – – – – – – –
cookies
const main = function(ctx) {
 ctx.cookies.set('view', '187'); //设置
 ctx.response.body = ctx.cookies.get('view'); //取值
}